
Guía para crear productos en WooCommerce
Actualizado hace 3 semanas
En muy breves pasos aprenderás a subir tus productos de manera clara y sencilla. Además, te recomendamos al final un plugin que facilitará muchísimo la actualización de precios de manera masiva. ¿Comenzamos?
Lo primero: si no estás logueado a tu cuenta, por favor ingresá a la misma y dirigite al Escritorio de tu WordPress. El acceso normalmente se ubica en la dirección tusitio.com/wp-admin
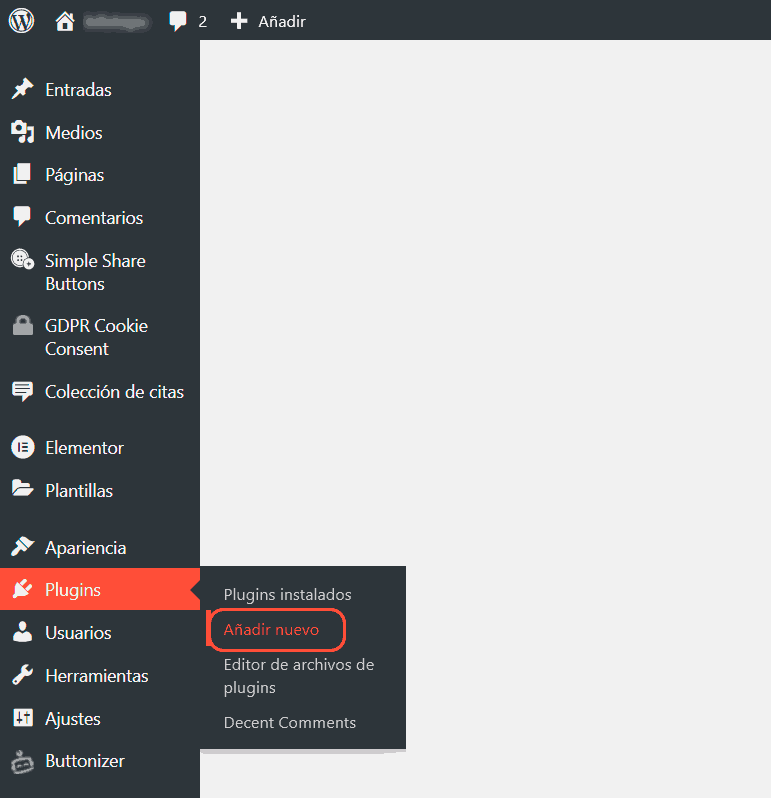
Asumimos que ya tenés WooCommerce instalado. Si no es así, podés descargalo ahora gratuitamente desde Plugins → Añadir nuevo según se indica en la captura inferior.
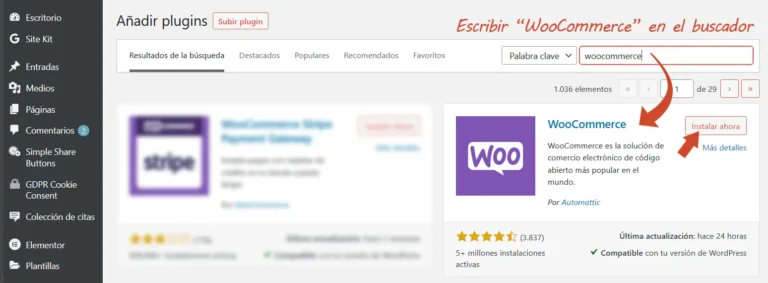
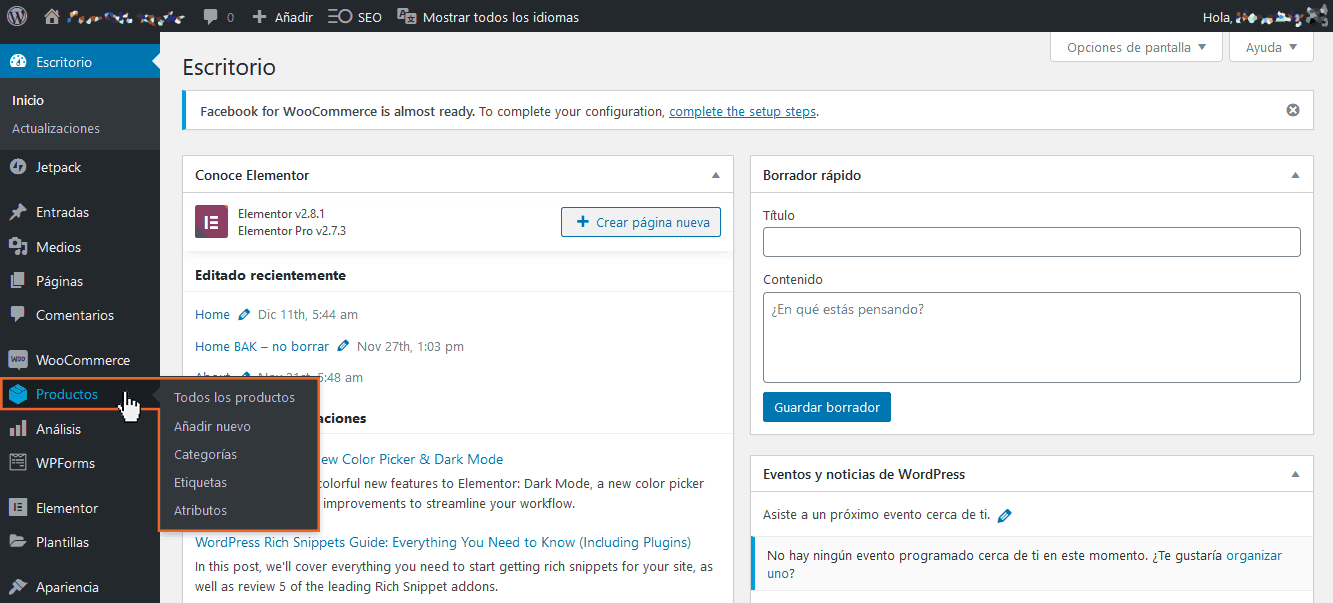
Tras una breve "encuesta" que realiza el componente para geolocalizar y tematizar la instalación, podremos comprobar que dos nuevos ítems han aparecido en nuestra barra de herramientas de Escritorio: WooCommerce y Productos. En esta guía nos ocuparemos de Productos tal cual lo anticipamos.
Crear nuestra primer categoría
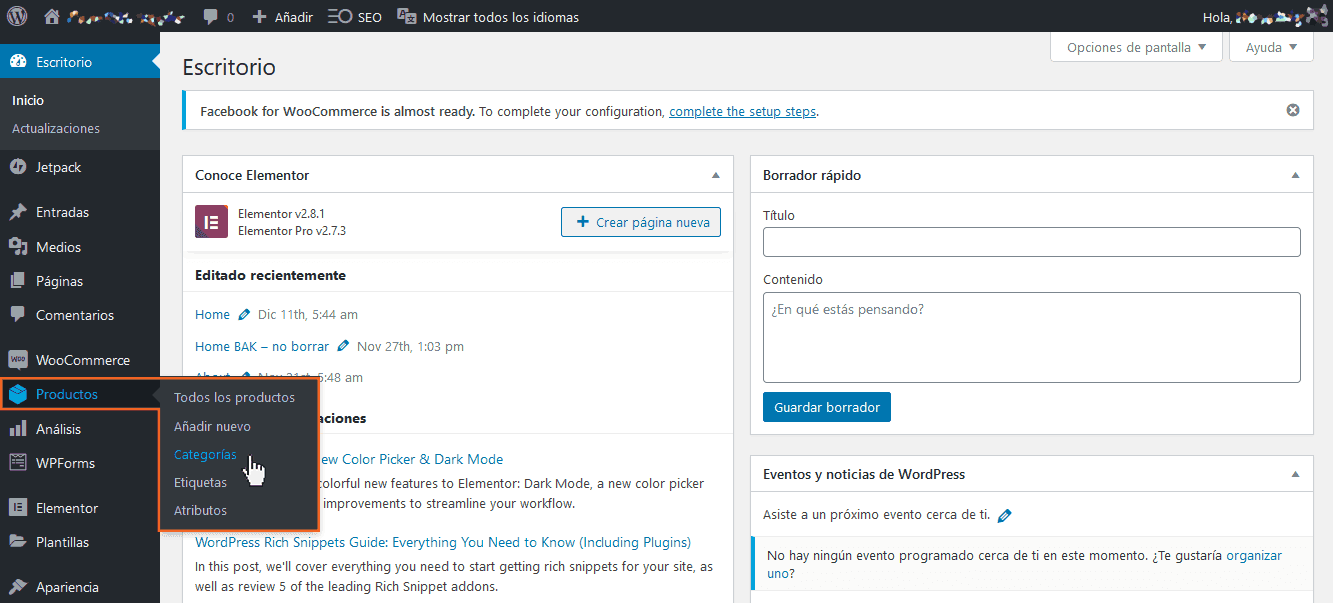
El primer paso recomendado es crear las Categorías de nuestros Productos. Por ejemplo: tortas, galletas, budines, cup cakes, etc. Para eso, vamos a entrar a la opción de Categorías.
En la ventana que se ha abierto podemos visualizar algunos campos y un par de opciones. Completando esta información es que crearemos la primera de nuestras Categorías, necesarias para, posteriormente, ordenar nuestros productos por las mismas.
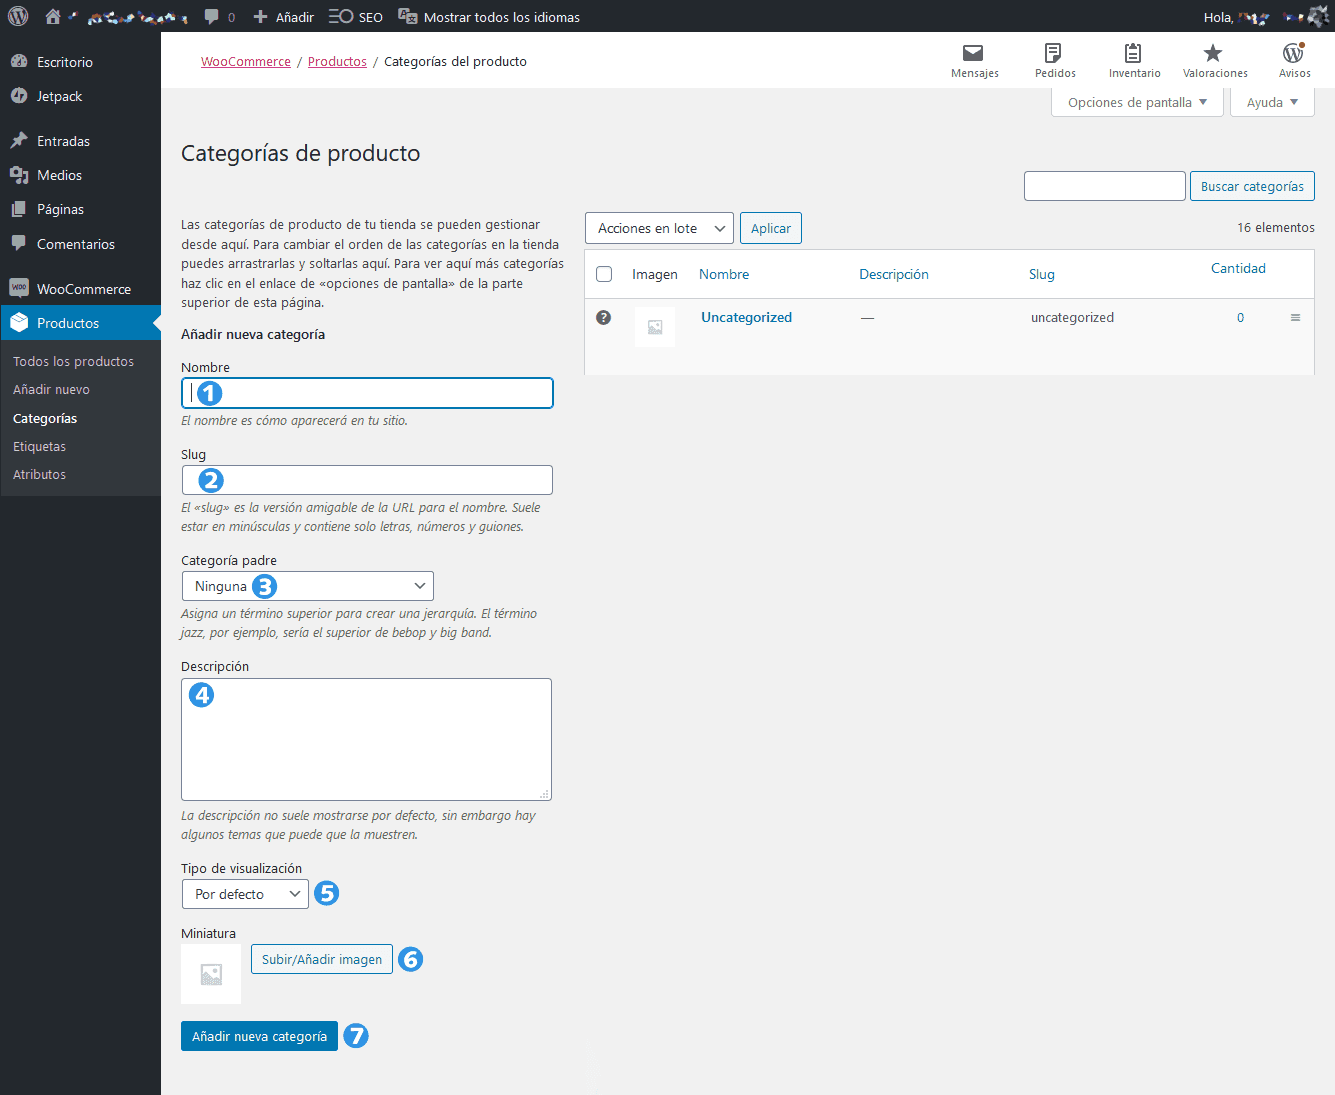
A continuación, una descripción de cada uno de los campos:
Nombre: acá escribimos el nombre de nuestra Categoría; por ejemplo, “tortas”.
El Slug es el nombre interno de la categoría dentro de la base de datos; por orden general, será el mismo de la categoría en sí, y por ende no deberíamos escribir nada allí. Si lo dejamos vacío, Woo entenderá que deseamos que el “slug” sea el mismo que el nombre de la categoría (es decir ”tortas”).
Categoría padre nos permite especificar si la Categoría que estamos creando se trata de un grupo de Productos principal (será así por defecto) o bien una Subcategoría (ejemplo: “tortas veganas”). Si hubiéramos creado la categoría “Tortas”, en esta pantalla también se nos permite entonces crear una Subcategoría. Ejemplo: habiendo previamente creado la categoría Tortas, si estamos creando ahora “tortas veganas”, podemos seleccionar como Categoría padre a “tortas”.
Aquí ingresaremos un Texto descriptivo de la categoría; será el mismo que verán nuestros usuarios cuando ingresen a la categoría principal “tortas”. NOTA: no todos los temas de WordPress presentan este texto al usuario.
Tipo de Visualización nos permite decidir lo que se muestra en la página de la Categoría (ej.: misitio.com/tortas). "Estándar" utiliza el valor predeterminado por el tema. "Subcategorías" mostrará sólo las subcategorías (ej: “tortas de chocolate”, “tortas de crema”, etc.). "Productos" sólo mostrará los productos propios de la categoría. “Ambos" mostrará tanto subcategorías como productos principales. Para fines de este instructivo dejaremos la opción por defecto.
A través de la Miniatura, WooCommerce nos permite especificar una imagen genérica para toda la Categoría. Esto es opcional, y, nuevamente, no todos los temas publican esta imagen. No obstante, en este caso lo recomendamos de manera preventiva. NOTA: siempre es conveniente que todas las imágenes que subamos al sitio, tanto de categorías como de productos, tengan el mismo tamaño. Por ejemplo, 700 píxeles de ancho por 625 de alto es un tamaño recomendado. Si se cuenta con un fotógrafo que se ocupa de capturar nuestros productos, podemos solicitarle que siempre nos entregue el material en dicho tamaño. Otra opción es emplear un programa de edición de bitmaps (fotos) como lo es PhotoShop o LightRoom, aunque también existen herramientas muy fáciles y poderosas online, como https://resizeimage.net/
El botón Añadir nueva categoría nos permitirá dar por terminada la creación de la misma.
Para esta guía, hemos creado la categoría “tortas”, y podemos verla aquí de la siguiente manera:
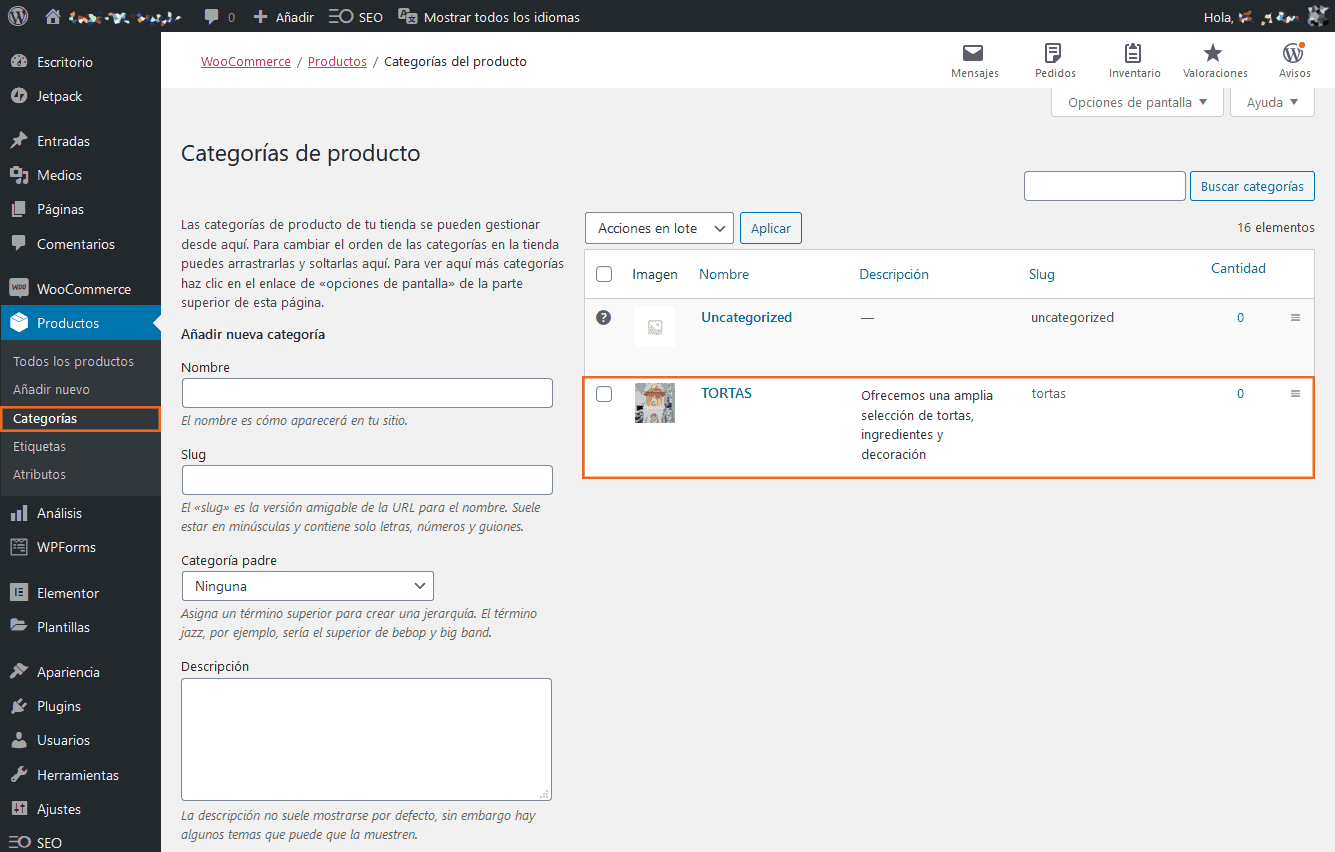
Si hemos olvidado algo, un aspecto no nos gusta o queremos realizar algún cambio, nos desplazaremos con el puntero del mouse sobre la categoría, y una serie de opciones se mostrarán automáticamente:

La opción Editar nos devolverá a la pantalla que hemos presentado en la captura más arriba; allí podremos cambiar cualquier campo, incluyendo la imagen de la Categoría (si es que hemos cargado alguna).
Por otro lado, nótese que la opción Borrar nos permite eliminar de cuajo la Categoría, para los casos que alguna línea de productos se haya discontinuado. Si ya habíamos incluido Productos en la Categoría que borramos, los mismos quedarán "huérfanos" bajo la Categoría por defecto, llamada "Sin Categorizar".
Cargando nuestro primer producto en WooCommerce
Ahora que ya hemos creado (al menos) una Categoría, es momento de cargar un producto dentro de ella. Iremos a Productos → Añadir nuevo tal cual se muestra en la captura inferior. Nótese que se muestran números cuya descripción ampliamos debajo.
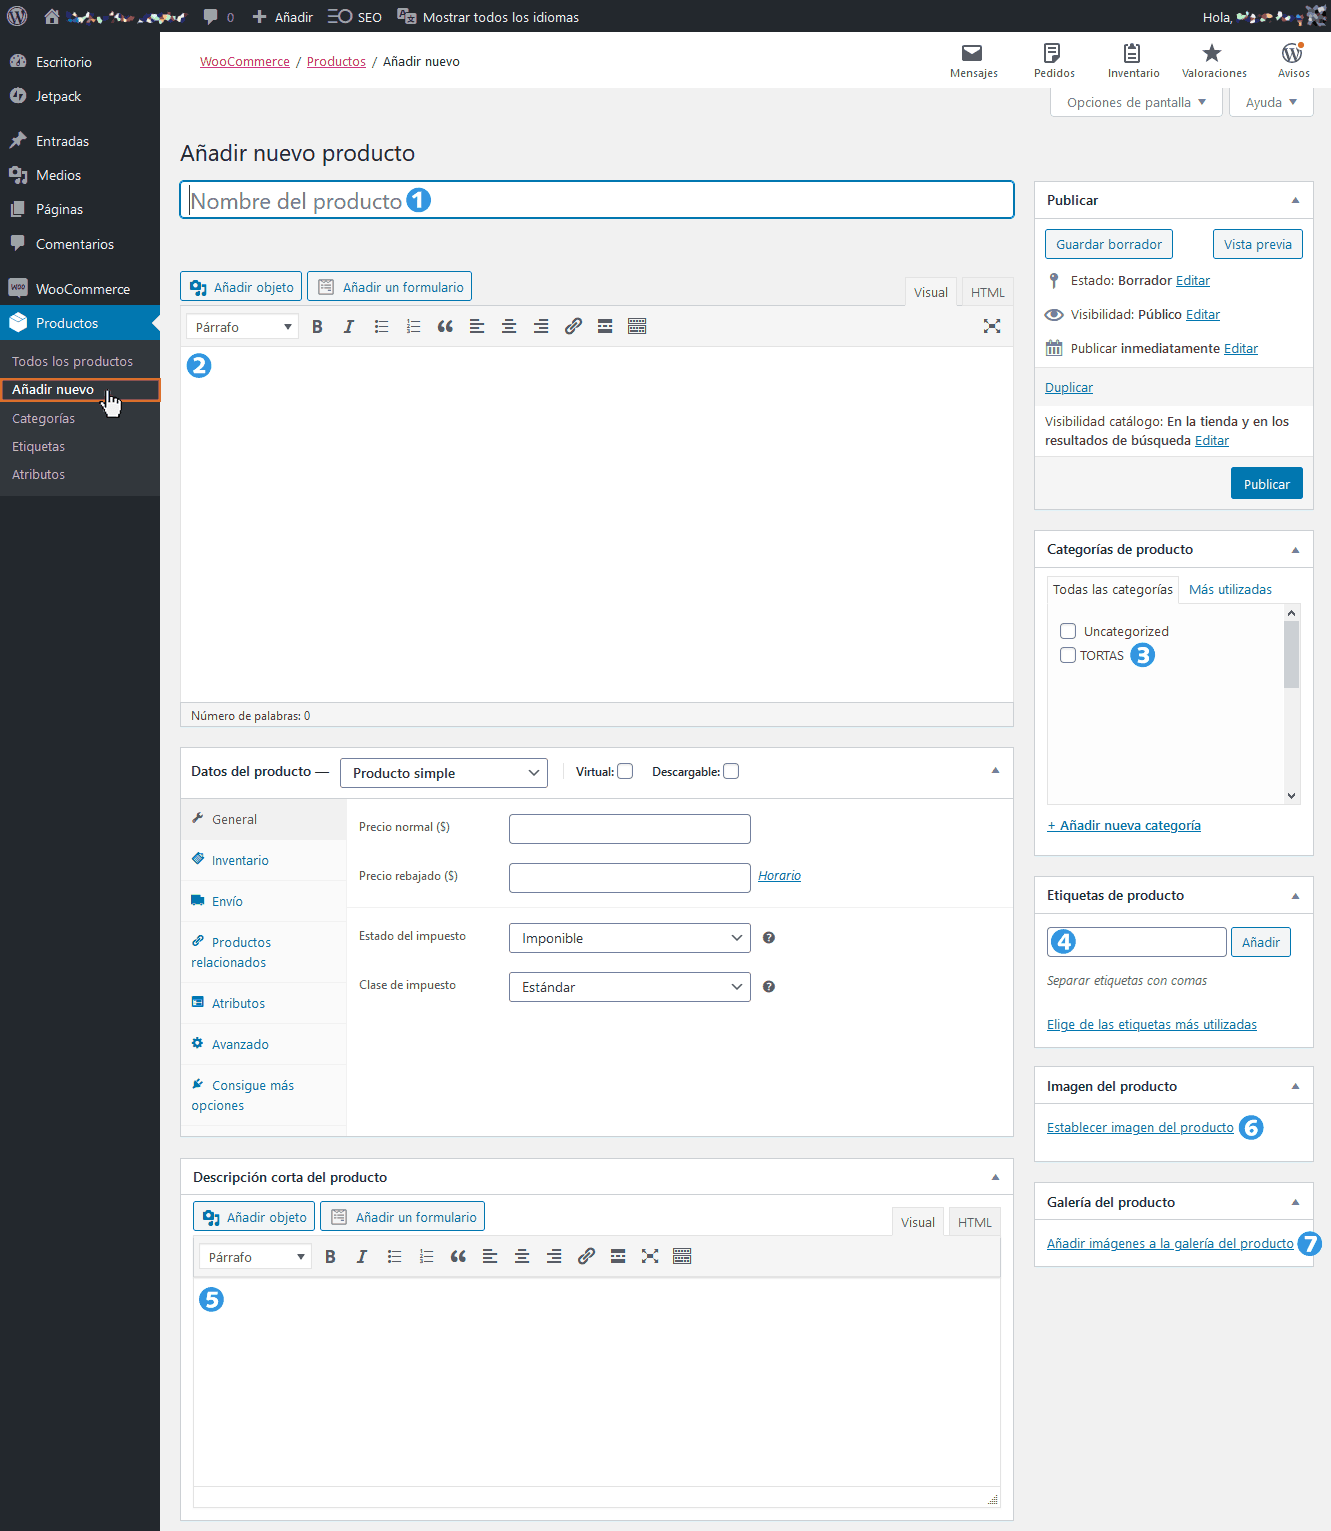
Los campos señalados, detallados a continuación:
Nombre del producto: en este campo ingresaremos el nombre de nuestro producto. Ejemplo: “Torta Selva Negra”. No sólo es el nombre que identificará a nuestro Producto, sino también el que van a ver nuestros usuarios (por ende, debe ser claro y conciso).
Campo de Descripción de información del Producto: este generoso campo es el lugar donde describir todo lo relevante a nuestro producto. Características, ingredientes, precauciones de manipulación y cualquier otro detalle pertinente.
Categorías del Producto: aquí marcaremos la Categoría correcta de nuestro Producto (ej.: “tortas”). NOTA: WooCommerce nos permite indicar más de una Categoría, porque podría existir un caso en donde el producto que estamos creando sea susceptible de pertenecer a dos o más clases. En general, es un caso que no se presentará.
Etiquetas de Producto: los "tags" o Etiquetas son muy convenientes para cuando deseamos relacionar un producto con aquellos que compartan una o más características. En el caso de ejemplo que venimos aprovechando, podríamos etiquetar por ingredientes. Ej.: “dulce de leche”, “chocolate”, “limón”... Las Etiquetas se escriben separadas por comas. Alternativamente, nos es posible escribir una Etiqueta, presionar ENTER, y luego seguir con otras. Cada vez que damos ENTER no sólo se asigna la etiqueta al producto que estamos editando, sino que también se crea la Etiqueta en la base de datos de WooCommerce (si ya no está creada antes). Esto a fines prácticos se reflejará en que, en el futuro, cuando ingresemos nuevos Productos y comencemos a tipear una Etiqueta, WOO autocompletará su nombre si la misma ya ha sido creada con anterioridad (por ejemplo, comenzamos a tipear “dul” y la opción “dulce de leche” se visualizará para que podamos tildarla sin necesidad de tener que escribirlo todo).
Descripción Corta del Producto: en este campo escribiremos un extracto breve, puntual, del producto. No obstante, para alguna clase de productos, ciertas Tiendas lo emplean para presentar al comprador una información diferente pero complementaria a la descripción larga. Ej.: tamaños, pesos, medidas, voltajes, tipo de embalaje, garantías, certificados, cantidad de piezas y un largo etcétera.
Imagen del Producto: haciendo clic en el enlace Establecer imagen del producto podremos cargar la fotografía principal del Producto que estamos ingresando. Nuevamente, recomendamos mantener un tamaño único para todas las fotos de nuestros productos, de ser posible.
Galería del Producto: haciendo clic en el enlace Añadir imagen a la galería del producto podremos cargar una o más fotografías de nuestro producto, lo que generará una galería cliqueable de fotografías, común en sitios de venta online como MercadoLibre (útil para mostrar diferentes perspectivas, algún ingrediente o cualquier imagen que complemente nuestro producto).
Llegó el momento de ponerle precio a nuestro producto. Enfoquémonos ahora en esta sección de la pantalla de creación de Producto nuevo:
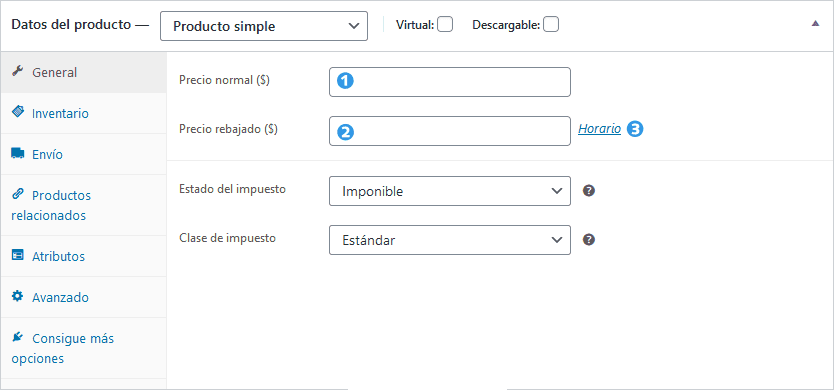
1. Precio Normal: aquí ingresaremos el valor de nuestro producto, lisa y llanamente.
2. Precio rebajado: opcionalmente, podemos ingresar un valor de oferta. Por ejemplo, si para alguna fecha especial (Pascuas, San Valentín, Navidad) deseamos ofrecer una rebaja a nuestros usuarios, éste el campo indicado para realizarlo. Una de las ventajas es que no afectamos el precio regular estándar, y, además, podemos activar o desactivar dicha rebaja sin necesidad de poner Precio rebajado en cero.
3. Nótese que el enlace numerado con 3, Horario, nos permitirá determinar una ventana de tiempo en donde este precio rebajado estará vigente. Al hacer clic se abrirán dos nuevos campos:
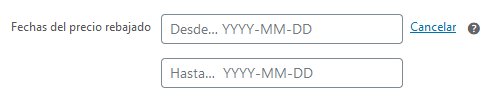
Basta colocar las fechas “Desde” y “Hasta” para que WOO quede programado para efectuar la rebaja en ese tiempo determinado.
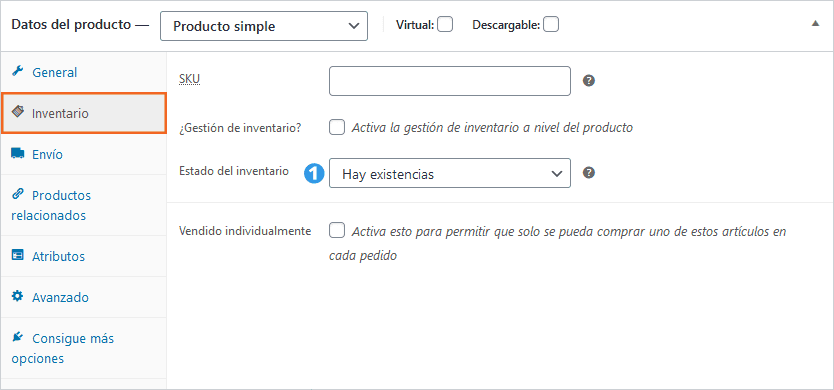
La solapa Inventario nos permite administrar cuestiones ligadas a nuestro stock.
1. Estado del inventario: en las opciones desplegables podemos seleccionar si el Producto se encuentra disponible o temporalmente fuera de stock (información que el usuario verá al ingresar a la página de presentación del Producto).
Nota adicional: SKU (Stock Keeping Unit) refiere a un código interno de identificación único que podemos ingresar si deseamos colocar una referencia numérica propia a cada producto estoqueado.
Por último, y como vemos en la captura inferior, la solapa Envío nos permite ingresar opcionalmente el peso y las medidas del producto en su caja.
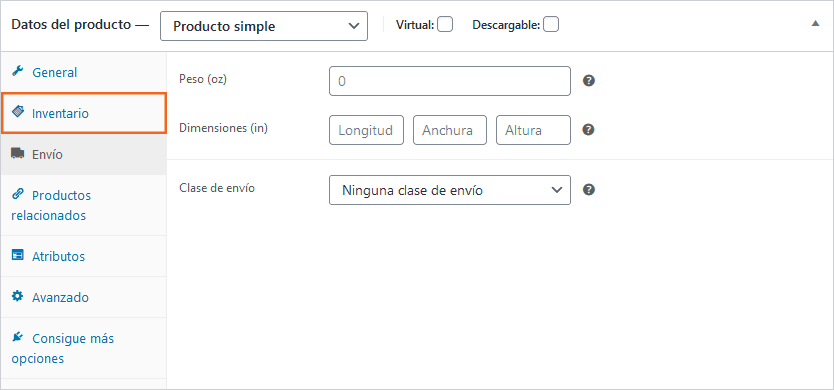
Aunque existen más posibilidades complejas para ciertos e-shops y tipos de Productos especiales, para los fines de esta guía fácil no ahondaremos en estos detalles. Enfoquémonos entonces en el cuadro superior derecho:
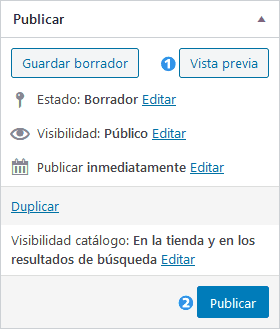
Vista previa: haciendo clic en este botón podremos previsualizar el producto en una ventana emergente. Podemos hacer esto cuantas veces sea necesario para mejorar la presentación de nuestro Producto y su información. Este botón no publica el producto.
Publicar: una vez conformes con los datos ingresados, haremos clic en el botón “Publicar” para dejar online nuestro nuevo ítem a la venta. A partir de entonces se verá en nuestro sitio para cualquier visitante y comprador potencial.
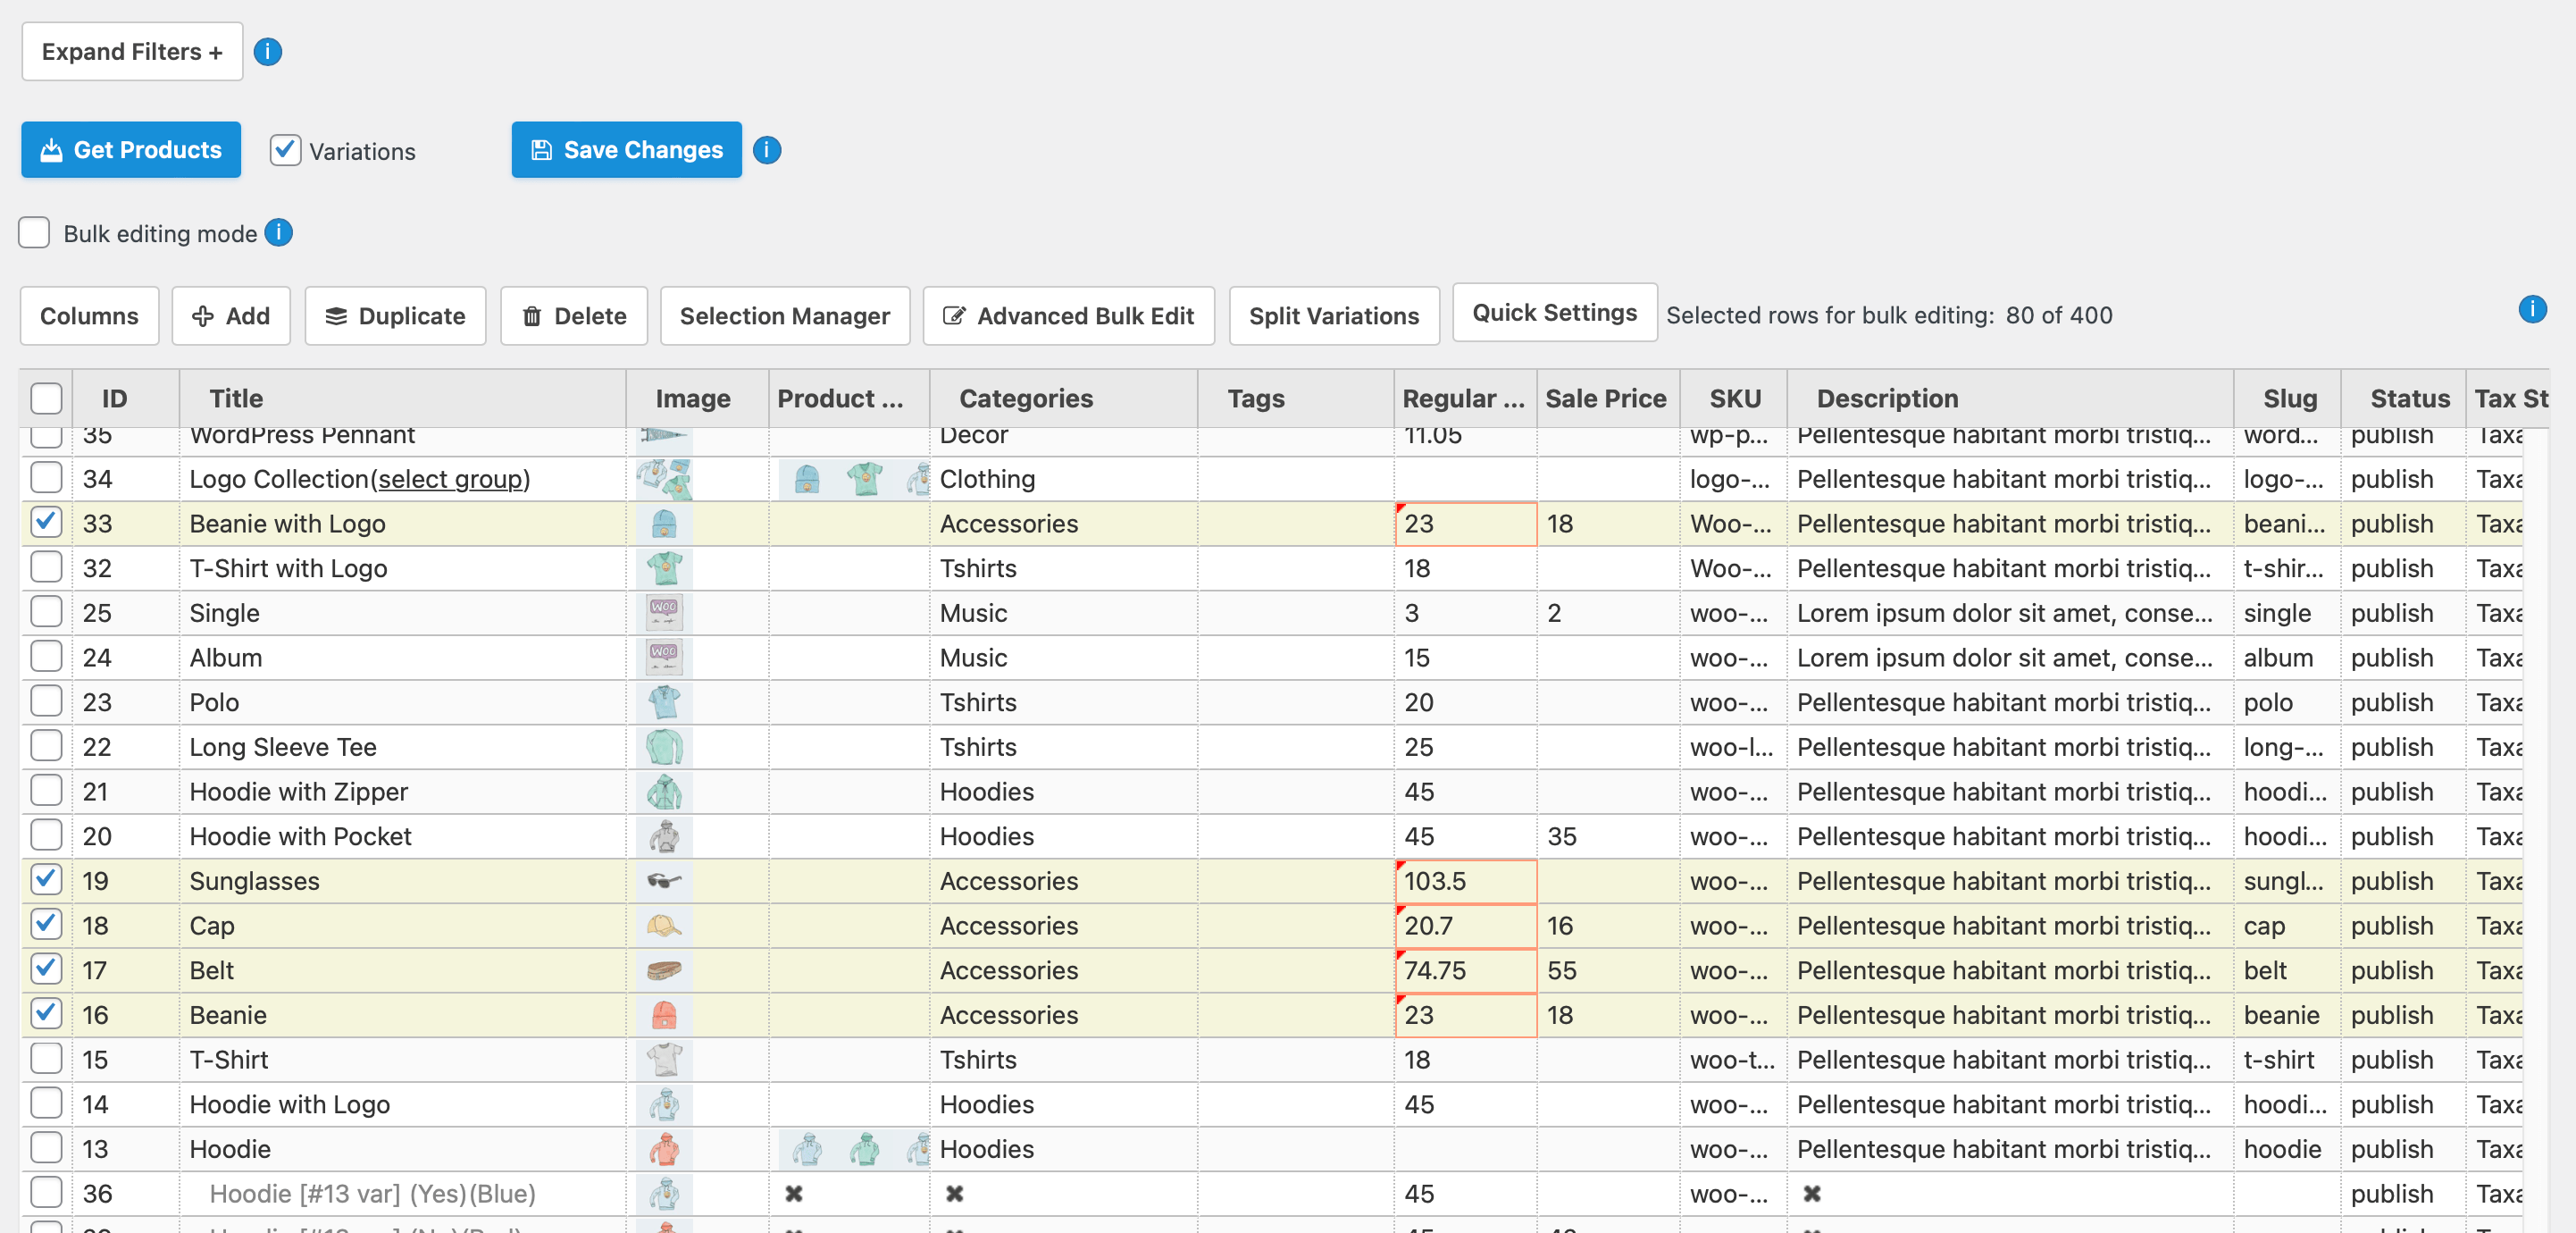
Tras estas instrucciones podemos dar por terminada nuestra guía fácil para que puedas comenzar a publicar tus productos de inmediato. Sin embargo, antes queremos recomendarte un plugin que te hará la vida más fácil: BEAR, Bulk Editor And Product Manager. Este componente permite la edición por lotes de absolutamente todos los campos de WooCommerce: Atributos, Categorías, Etiquetas, Taxonomías Personalizadas, Campos Meta, etc. Es tan poderoso y vuelve la vida tan fácil que consideramos incluirlo en esta guía.
Edición e importación masiva
En caso de que necesitemos importar masivamente productos en nuestra tienda, podemos usar las funciones nativas de WooCommerce para luego de haber creado nuestro primer producto, usar el botón "Exportar" para tener un .CSV con el formato que necesitemos completar, agregando todos los productos que necesitemos, para luego usar la función "Importar".
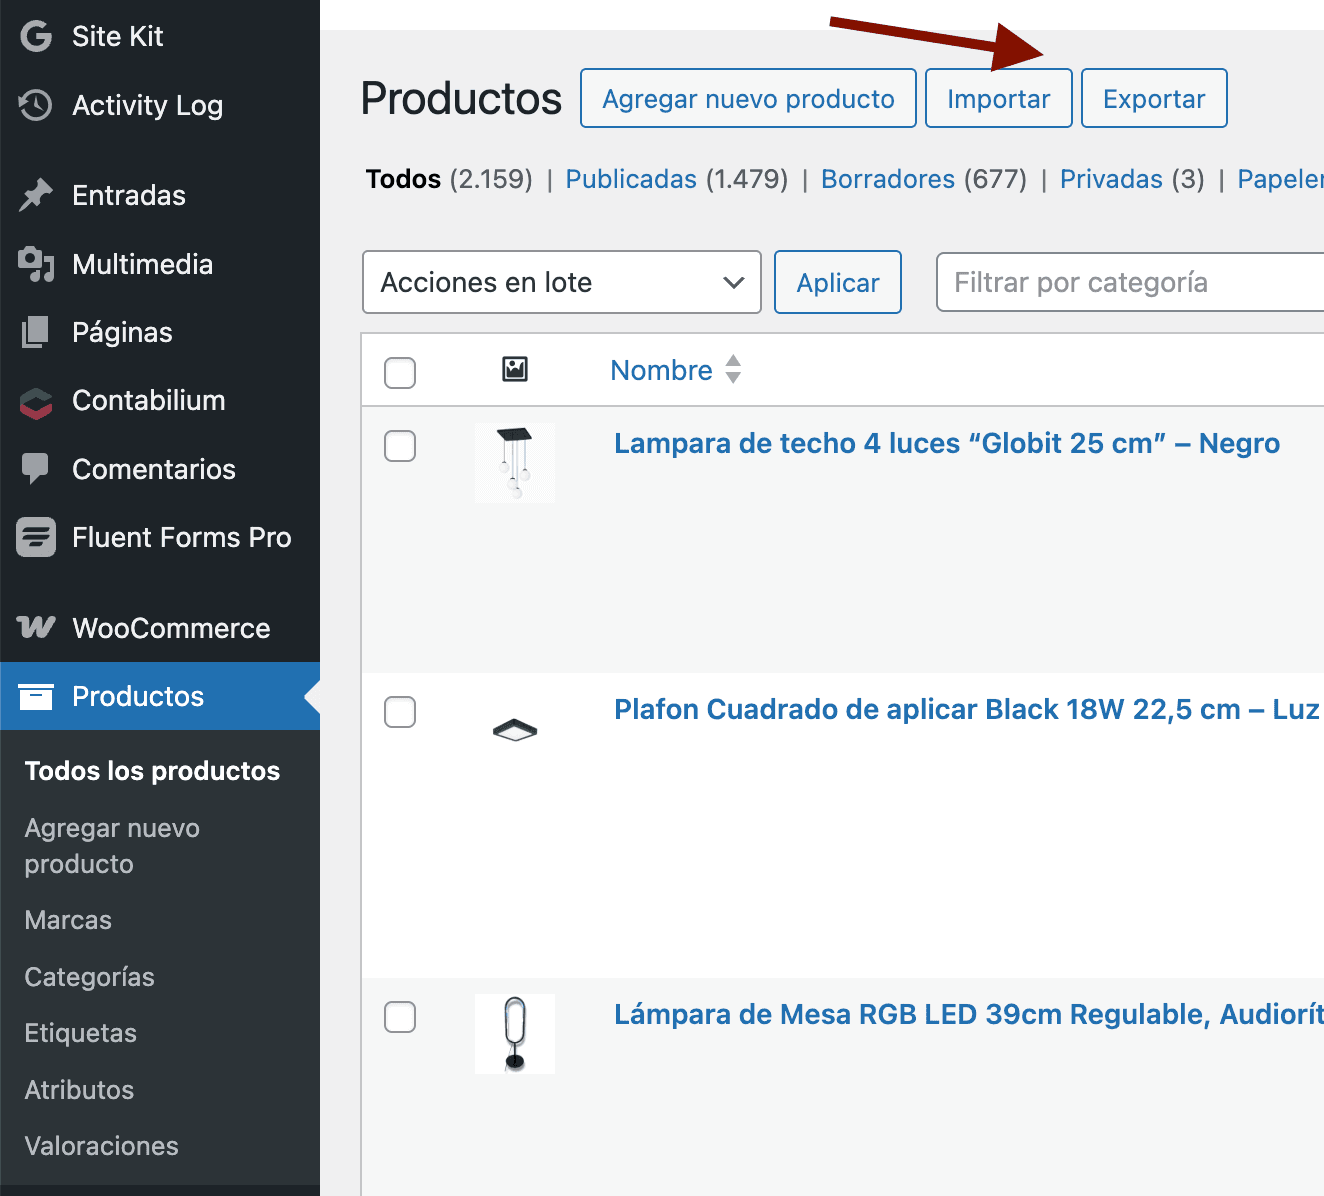
En caso de que busquemos herramientas para realizar ediciones masivas, a continuación compartimos algunos plugins útiles
WP All Import / Export Pro + WooCommerce Advanced Bulk Edit
La solución que nosotros recomendamos, para los casos mas complejos, y que incluimos en nuestro servicio de mantenimiento de WooCommerce, es WP All Import / Export Pro + WooCommerce Advanced Bulk Edit.