

Acceso temporal con dominio sin delegar
Actualizado hace 3 meses
En nuestra computadora, podemos editar el archivo hosts para forzar acceder a un sitio, como si estuviera alojado en una IP distinta de la que utilizan sus DNS.
Ésto es particularmente útil cuando estamos migrando nuestro sitio hacia otro servidor, para verificar el acceso antes de apuntar el dominio.
Este archivo es el que indica a qué IP buscar un dominio determinado, esquivando buscar su localización por el método tradicional (servidores DNS).
Si no recuerdas el número de IP o tu usuario, por favor escríbenos para que te enviemos los datos nuevamente.
¿Qué es el archivo hosts y dónde está?
El archivo hosts es un común y corriente archivo de texto. Sin embargo, su naturaleza simple está algo "oculta" porque no tiene la extensión típica .txt
La ubicación de 'hosts' en Windows es la siguiente (nota: si tenemos Linux o MacOS, veremos las instrucciones acordes más abajo):
C:Windows/System32/drivers/etc
Y no, no es un driver aunque se encuentre en la carpeta "drivers". Parece ser que el día en que querían ponerse de acuerdo en dónde situar el archivo hosts dentro de Windows, Míster Bill se había levantado con el pie izquierdo.
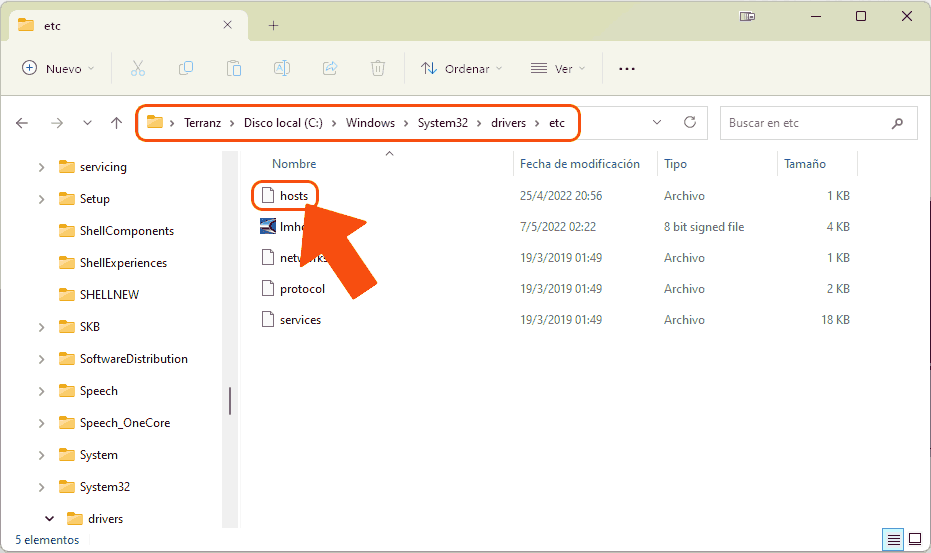
A pesar de, como hemos señalado, tratarse de un simple archivo de texto, al encontrarse éste dentro de una carpeta del sistema, sólo podremos editarlo con derechos de administrador.
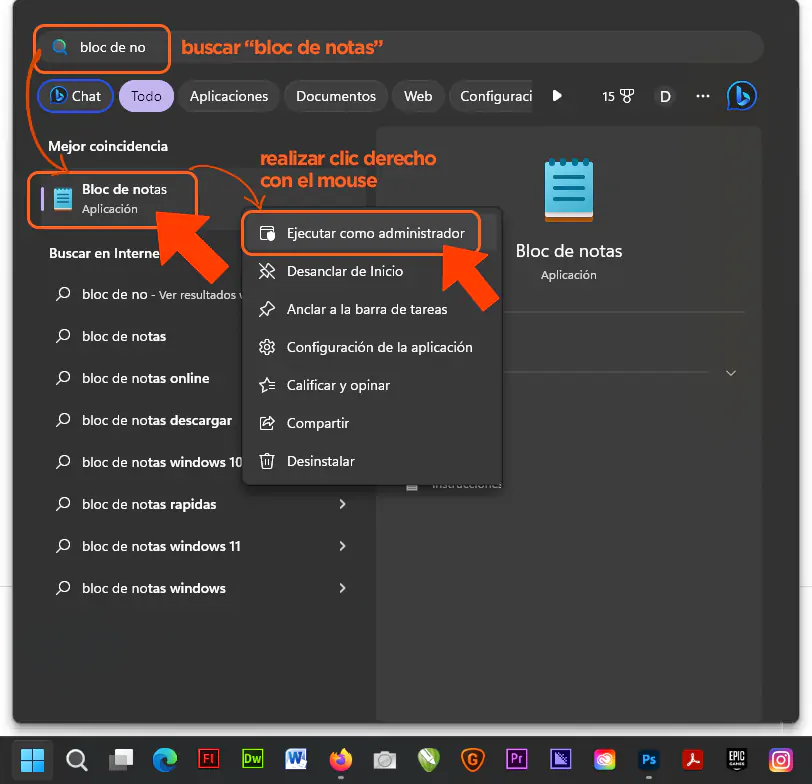
Lograr esto es fácil: simplemente ejecutaremos nuestra app de "bloc de notas" pero dándole clic derecho para poder hallar la siguiente opción necesaria:
Se nos presentará un cartel para admitir que el Bloc de Notas funcione con la capacidad de editar archivos protegidos del sistema. Algo así:
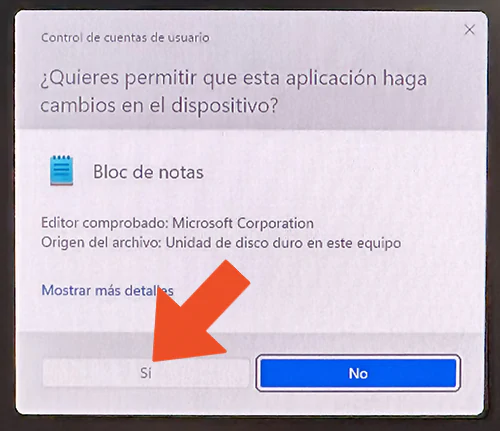
Por supuesto, debemos hacer clic en el botón de "Sí".
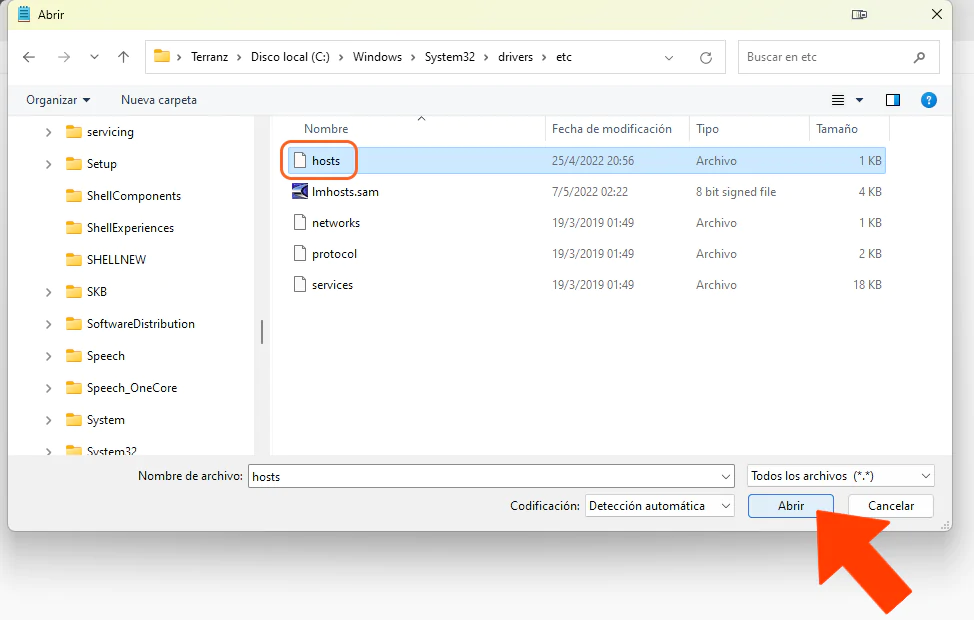
Hecho esto, aparecerá en pantalla el editor de texto tal cual lo conocemos (sólo que podrá permitirnos editar y grabar en el archivo hosts). En el Bloc de Notas iremos a Abrir y buscaremos el archivo hosts en la ruta previamente señalada (C:WindowsSystem32driversetc).
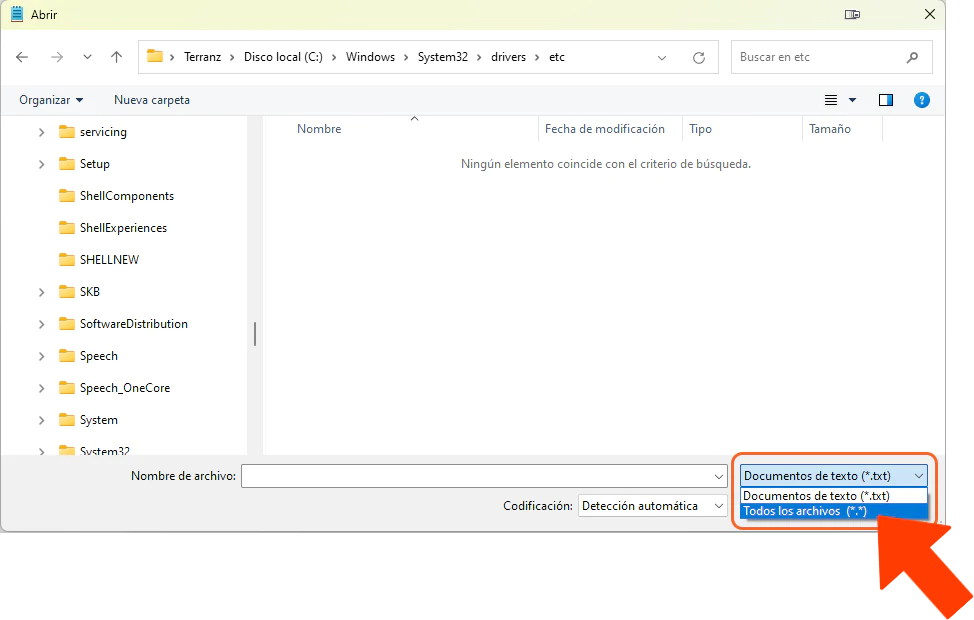
Atención: al llegar a la carpeta 'etc', no veremos nada. La explicación a esto es que ninguno de los archivos de dicha carpeta lleva la extensión .txt
Para poder ver el archivo hosts haremos clic donde señalamos en la captura inferior para seleccionar "Todos los archivos (*.*)":
Voilá!
El contenido del archivo hosts es realmente escueto. Apenas contendrá un texto informativo en inglés explicando su existencia. Es debajo de esta información en donde deberemos tipear la línea que nos compete. Para el ejemplo, hemos usado uno de los DNS de Duplika y el nombre ficticio típico www.misitio.com
Claramente, debemos ingresar los DNS reales que nos comparte nuestro servicio de hosting, y escribir la ruta correcta de nuestro sitio real (podría no ser con WWW).
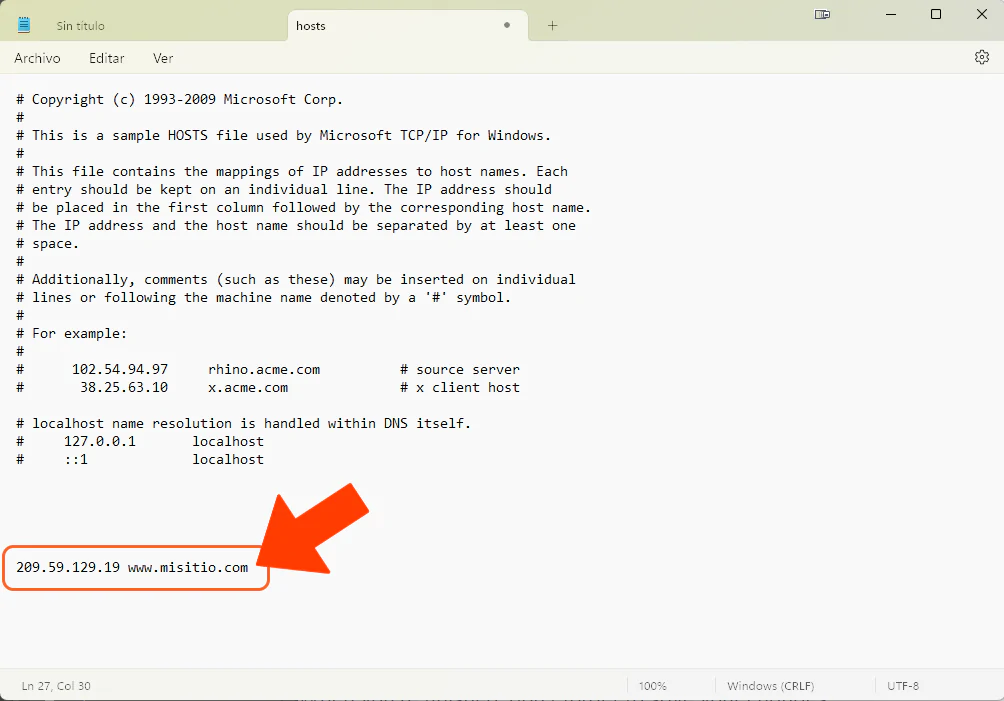
Al finalizar, grabaremos los cambios y cerraremos el Bloc de Notas.
Listo. Nuestro sistema operativo ahora no buscará la IP de nuestra web vía DNS como es usual, sino que sabrá de antemano el número IP del servidor donde alojamos, esté finalizada la propagación de DNS o no.
¿Cómo editar el archivo hosts con Linux?
En Linux podemos usar cualquier editor de texto de nuestro agrado:
nano /etc/hostsAbierto el archivo, añadiremos la IP y el dominio de nuestro sitio igual que como lo hemos señalado en la captura superior para Windows.
¿Cómo editar el archivo hosts con Mac?
Para editar el archivo hosts con MacOS abriremos el launchpad para buscar la app "Terminal". En la ventana de la Terminal escribiremos el siguiente código:
sudo nano /private/etc/hostsIngresaremos nuestra contraseña de Administrador y enseguida se abrirá el archivo hosts en Mac.
Gracias a esta edición, nuestro sistema operativo, como explicamos, no se apoyará en los DNS de Internet para encontrar el servidor de nuestro sitio, sino que lo sabrá sin tener que esperar a que la propagación de DNS finalice. Por ende, veremos nuestro sitio enseguida y/o podremos trabajar en él para dejarlo a punto.
Deseando que la nota les haya servido muchísimo, los invitamos a dejar sugerencias, dudas y experiencias en la sección de comentarios. Éxitos, y gracias por leer.