

¿Cómo agregar mi sitio a Google Search Console?
Actualizado hace 2 semanas

Google Search Console nos permite monitorear el rendimiento de nuestro sitio y saber todo en cuanto a nuestras visitas. ¿Cómo llegan a nuestro sitio? ¿Qué problemas hay en la indexación del contenido? ¿Cómo nos ve Google? Search Console es gratis, y muy conveniente.
Por otro lado, si bien tarde o temprano los robots de Google van a rastrear nuestro sitio para poder mostrarlo en sus resultados de búsqueda, enviar un mapa de nuestros contenidos acelera el proceso.
¿Necesario? No. Conveniente, ¡muy! Por eso, en esta guía veremos cómo crear una cuenta en Google Search Console si aún no la tenemos, cómo crear un sitemap.xml y cómo subirlo. ¿Ya tienen el cafecito humeando? Arranquemos.
¿Qué es Google Search Console? ¿Para qué me sirve?
Google Search Console es un compendio de herramientas y generación de informes sobre las entradas en nuestra web. Permite optimizar, a veces corregir nuestro contenido para que sea lo más accesible posible a los usuarios cuando realizan búsquedas. GSC nos va a mostrar qué consultas atraen el tráfico hacia nuestra web y analizará las impresiones, los clics y la posición de nuestro contenido en las búsquedas orgánicas dentro de Google.
Ocasionalmente, puede enviarnos alertas cuando se detectan problemas en nuestra web, de modo que podamos corregir los problemas.
¿Qué es un sitemap o mapa de mi sitio?
Un mapa del sitio es un archivo que muestra información sobre las páginas, videos y otros archivos de nuestra web (además de las relaciones entre ellos). Los motores de búsqueda (como Google) leen este archivo para rastrear nuestro sitio de manera más eficaz. El mapa le indica a los motores de búsqueda qué páginas y archivos se consideran importantes o prioritarios, y también proporciona información valiosa sobre los archivos mismos que forman parte de nuestro contenido. Por ejemplo, cuándo se actualizó una página por última vez, o las versiones de la página en otros idiomas.
Podemos aprovechar las ventajas de un mapa del sitio para brindar información sobre determinados tipos de contenido, como videos, imágenes o noticias.
¿Cómo creo un mapa de mi sitio?
Buena noticia: los mapas se generan automáticamente si estamos usando WordPress. Para comprobar su existencia, basta añadir /sitemap.xml a la dirección de nuestra web, es decir misitio.com/sitemap.xml (cambiando misitio.com por el nombre de dominio real).
Si ocurre que tenemos instalado algún plugin de SEO, las 2 alternativas más livianas que recomendamos son Slim SEO y The SEO Framework.
Si en ninguna de las dos direcciones vemos algo como esto...
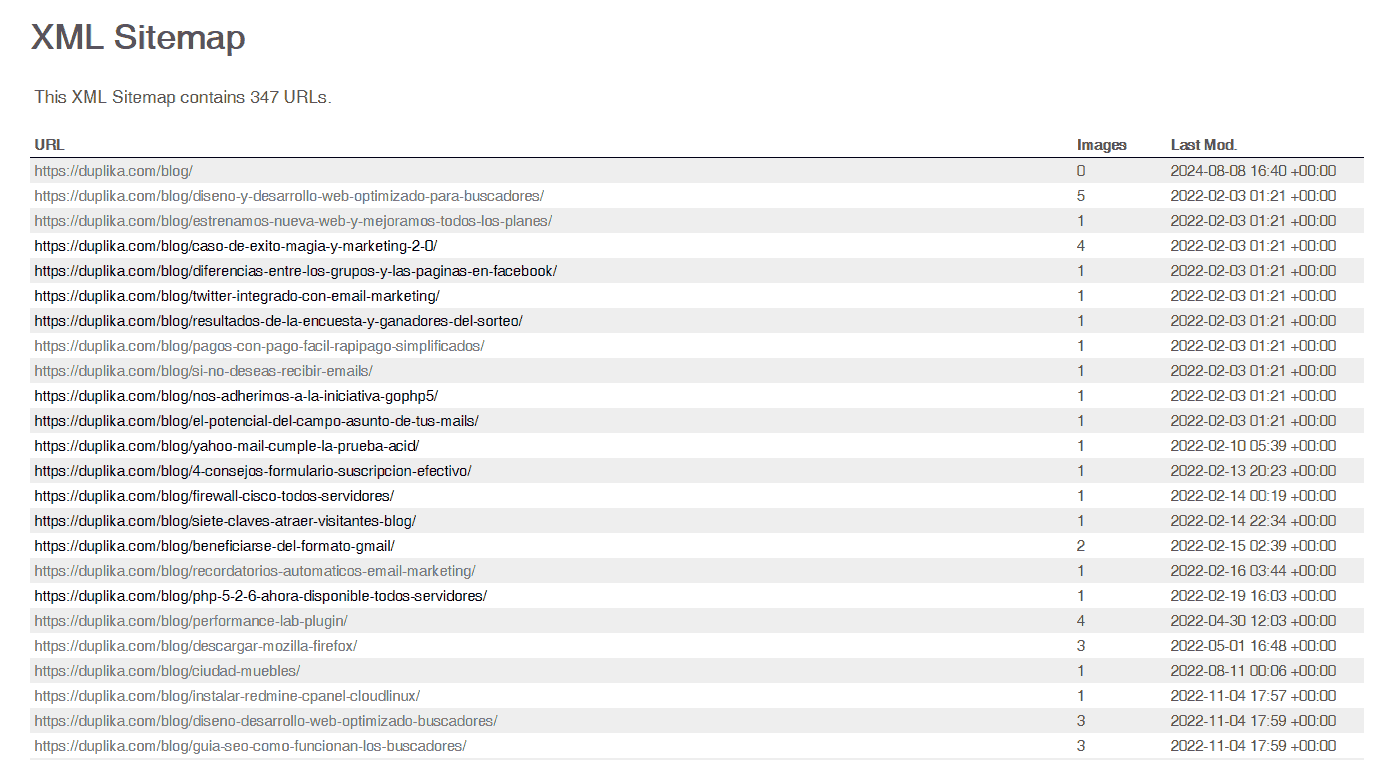
...debemos asegurarnos de que, por alguna razón, no le estemos permitiendo a los robots rastreadores sondear nuestros contenidos. Por eso, verifiquemos que la siguiente opción NO esté tildada:
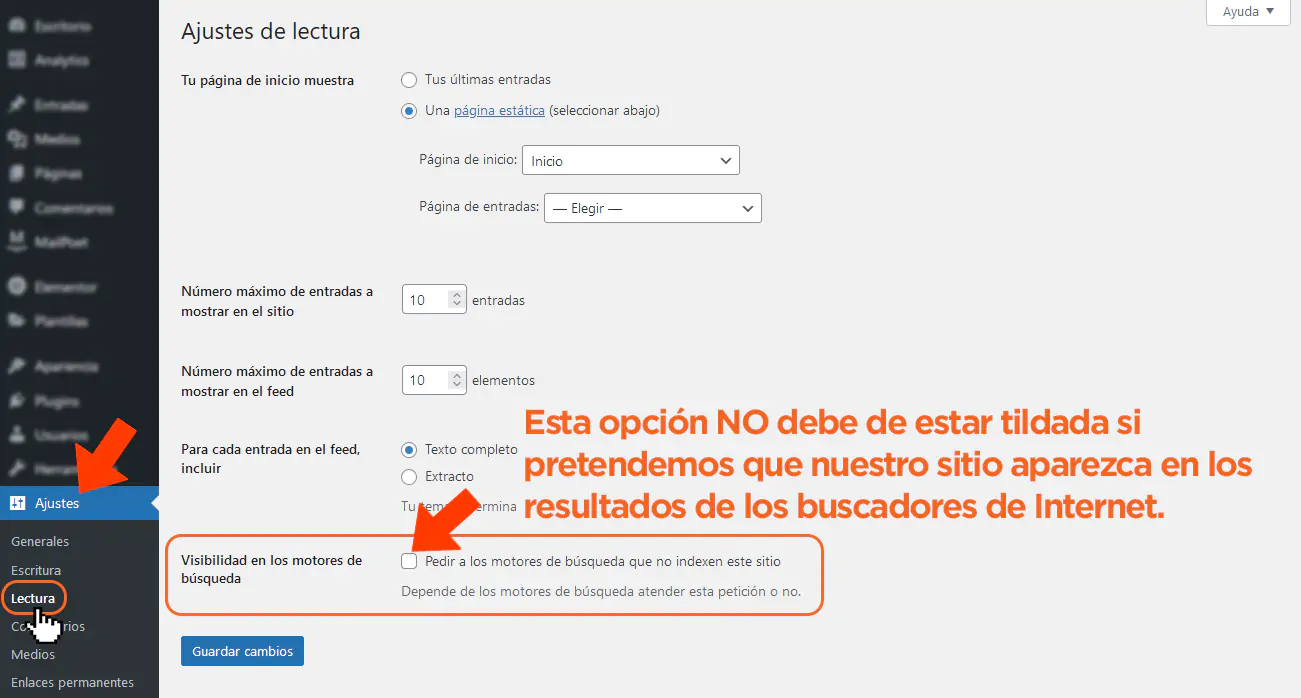
Recapitulando, WordPress, de manera natal —lo que es decir: sin necesidad de componentes de terceros— realiza por defecto un archivo sitemap.xml.
¿Cómo configurar una cuenta de Google Search Console?
Debemos ingresar a https://search.google.com/search-console/
Lo primero que veremos es una pantalla como la siguiente, en donde se nos solicita que ingresemos una "propiedad", el modo en que llama Google a nuestro sitio web (es decir, del que somos propietarios).
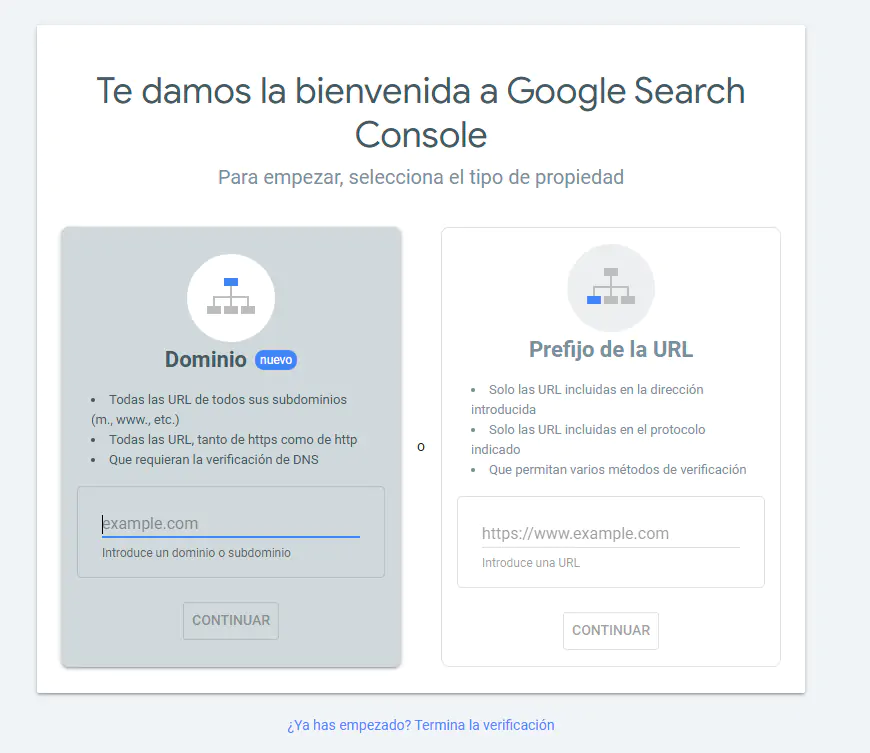
Tenemos dos opciones que sirven al mismo fin: añadir el dominio (misitio.com) o el prefijo (https://misitio.com).
Añadiremos el dominio ingresando el nombre de nuestro sitio en la primera columna, sin HTTP/HTTPS o WWW. De este modo obtendremos datos de todas las URLs bajo el nombre de dominio, incluidos los protocolos, subdominios y rutas. Más adelante, en esta misma guía, haremos el recorrido para el Prefijo explicando mejor las diferencias entre ambas opciones.
Google nos arrojará una ventana emergente en donde nos ha creado un código de verificación en formato de texto (TXT). Debemos hacer clic en el botón señalado en la captura inferior:
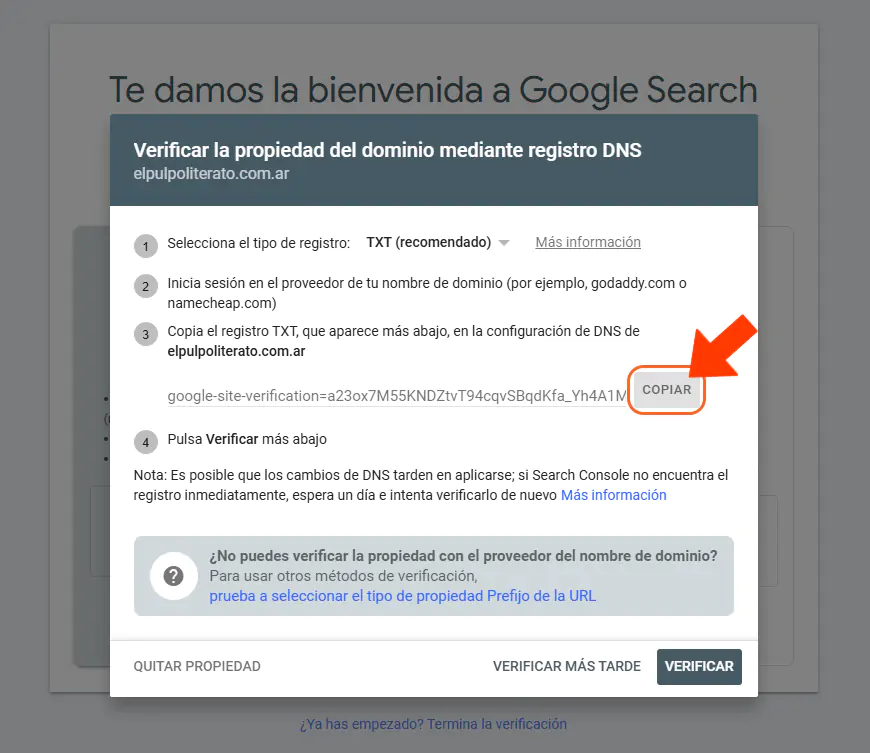
Para estar más cómodos, nos conviene abrir otra solapa de nuestro navegador. Allí ingresaremos a la cuenta en donde hemos registrado nuestro dominio.
A continuación, veremos cómo realizar este paso vía cPanel, luego cómo hacerlo con la empresa número 1 en venta de dominios, que es GoDaddy, y finalmente ilustraremos también como realizar la verificación, más allá de la empresa u organismo en donde hemos adquirido el nombre de dominio, a través de un método alternativo.
Validación a través de cPanel
cPanel es un panel de control al cual se accede online: es fácil, cómodo, y ciertas empresas de hosting lo proveen gratuitamente junto con el plan de hosting (incluyéndonos).
cPanel nos permite gestionar nuestro dominio (además de administrar correos, seguridad, webmail y un gran etcétera) a través de una interfaz gráfica intuitiva. En este caso veremos cómo añadir el registro DNS provisto por Google Search Console con esta herramienta tan versátil.
Primero, debemos ingresar a nuestro cPanel, típicamente ingresando en la barra de direcciones su dirección dominio-dependiente:

Recordemos reemplazar "misitio" por el nombre real de tu dominio!
Tras ingresar con nuestras credenciales —provistas por la empresa que nos brinda hosting—, veremos una serie de herramientas separadas por grupos. Allí, debemos buscar el ícono de ZONE EDITOR dentro del grupo de herramientas DOMINIOS, indicado en la captura inferior:
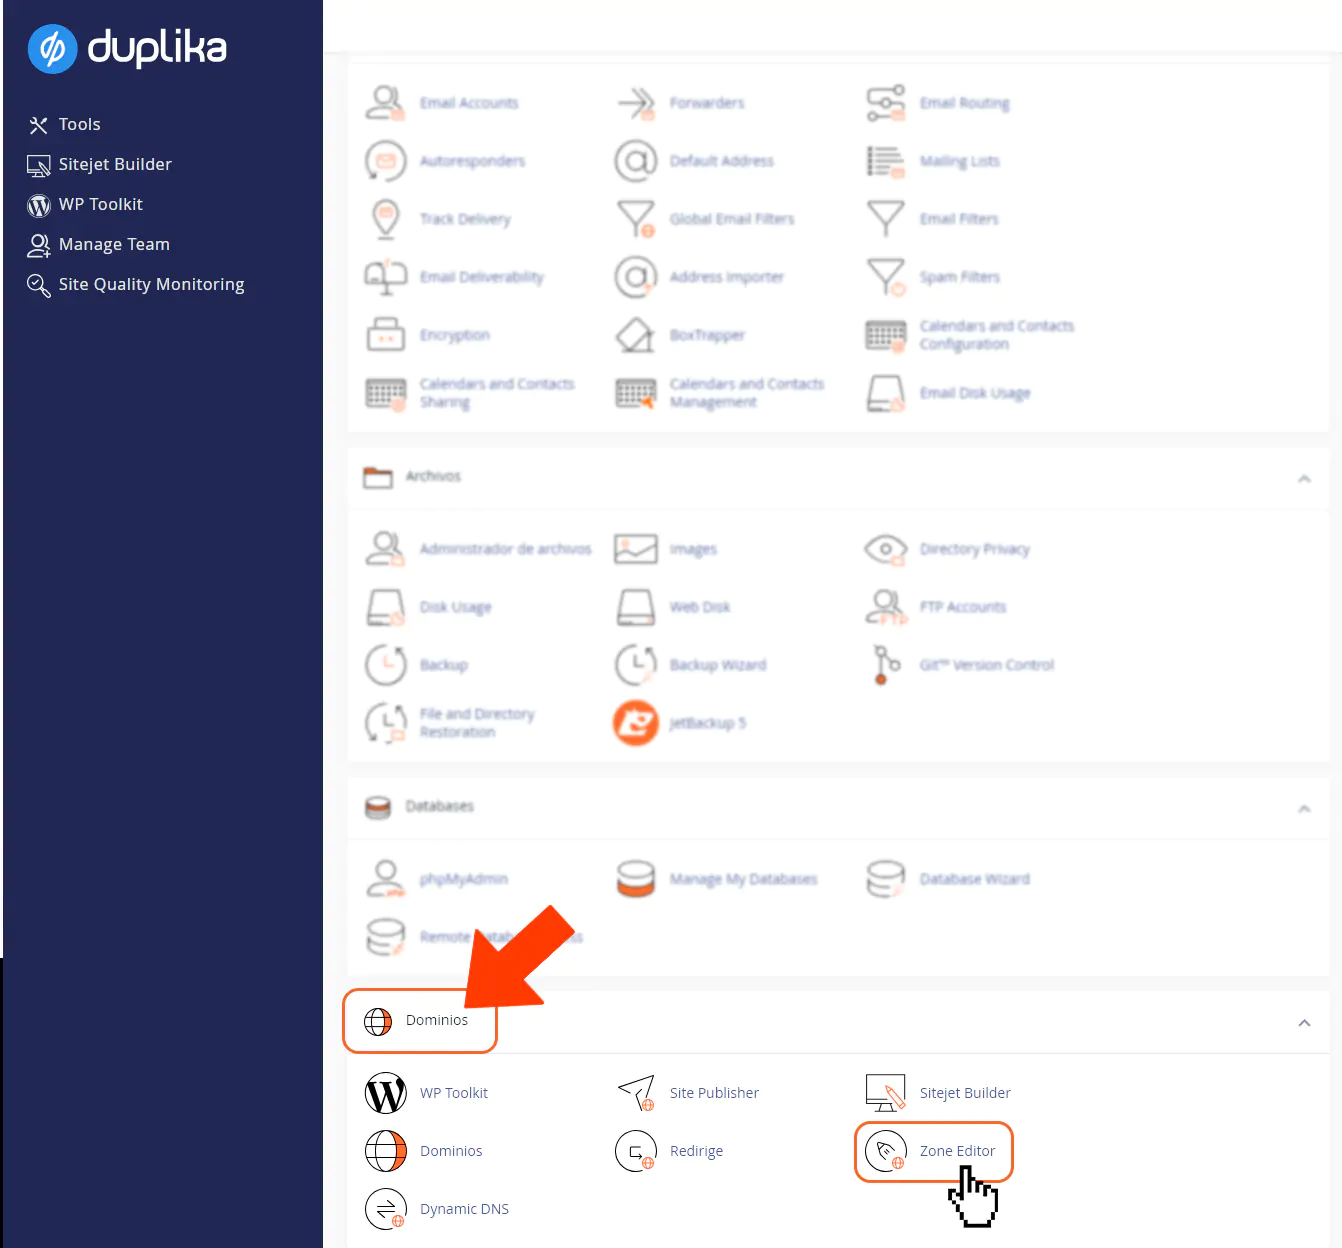
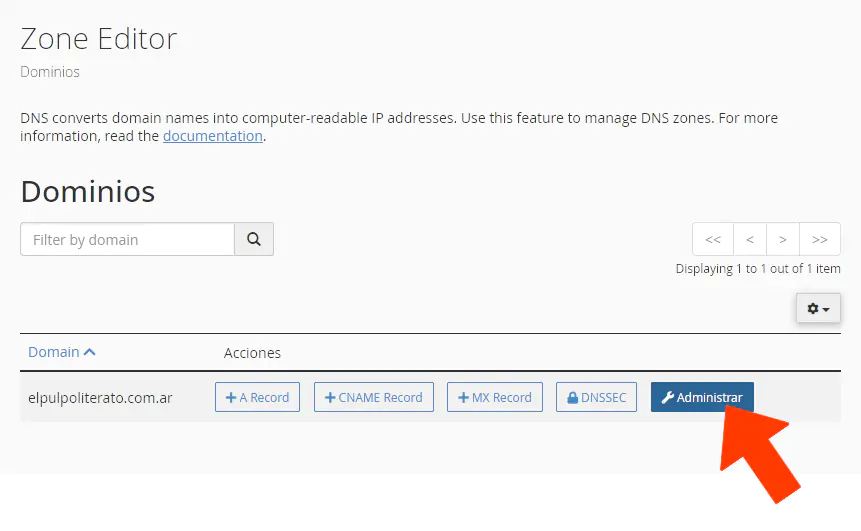
Haremos clic sobre este ícono ZONE EDITOR, y, acto seguido, clic sobre el botón ADMINISTRAR.
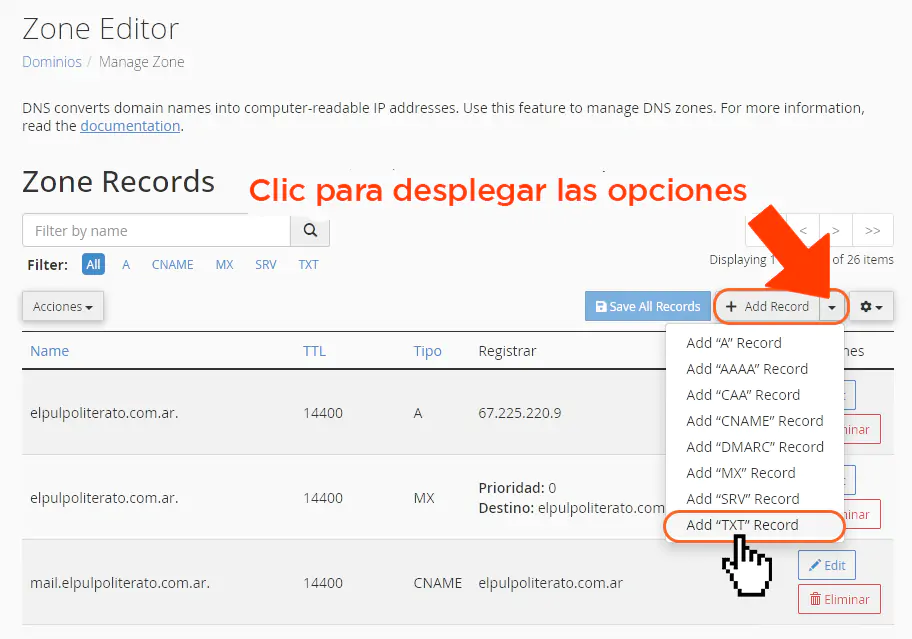
En la pantalla siguiente, buscaremos el botón de ADD RECORD (añadir registro) y ahora haremos clic sobre la flecha para desplegar el menú de alternativas. Como vamos a añadir un registro de TXT —según nos ha solicitado Google Search Console—, cliquearemos sobre ADD "TXT" RECORD según mostramos en la imagen inferior.
Rellenaremos los campos que se nos ofrecen de la siguiente manera:
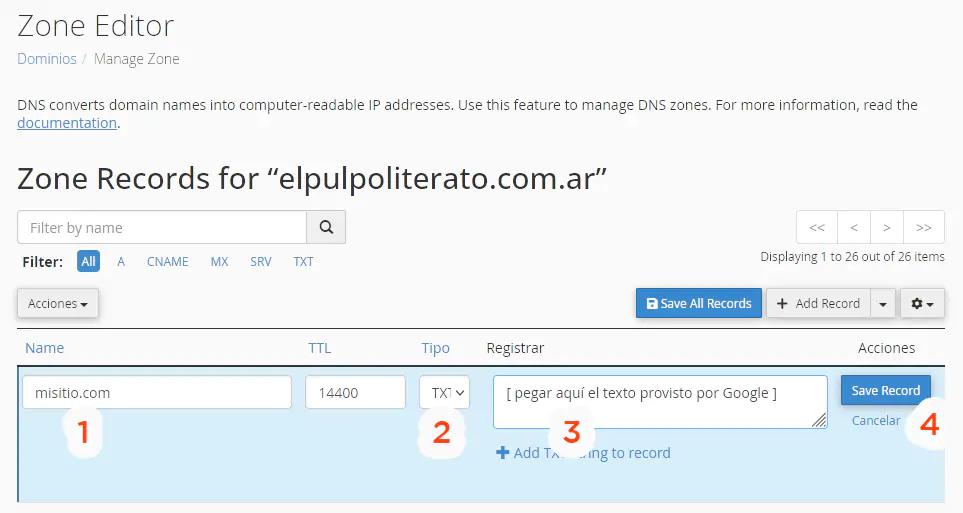
En el primer campo NAME ingresaremos nuestro nombre de dominio sin http ni www.
No tocar, debe de ser TXT (si por alguna razón no lo es, seleccionarlo correctamente en el desplegable)
Aquí pegaremos el texto provisto por Google.
Clic sobre SAVE RECORD para terminar.
Recordemos que este trámite podría tardar desde unos minutos hasta varias horas. Por ende, esperemos un tiempo antes de volver a Google Search Console para validar.
Verificar propiedad con GoDaddy
Tras ingresar a nuestra cuenta, buscaremos el dominio en cuestión en la sección de nuestros productos y haremos clic según se ilustra con la captura inferior:
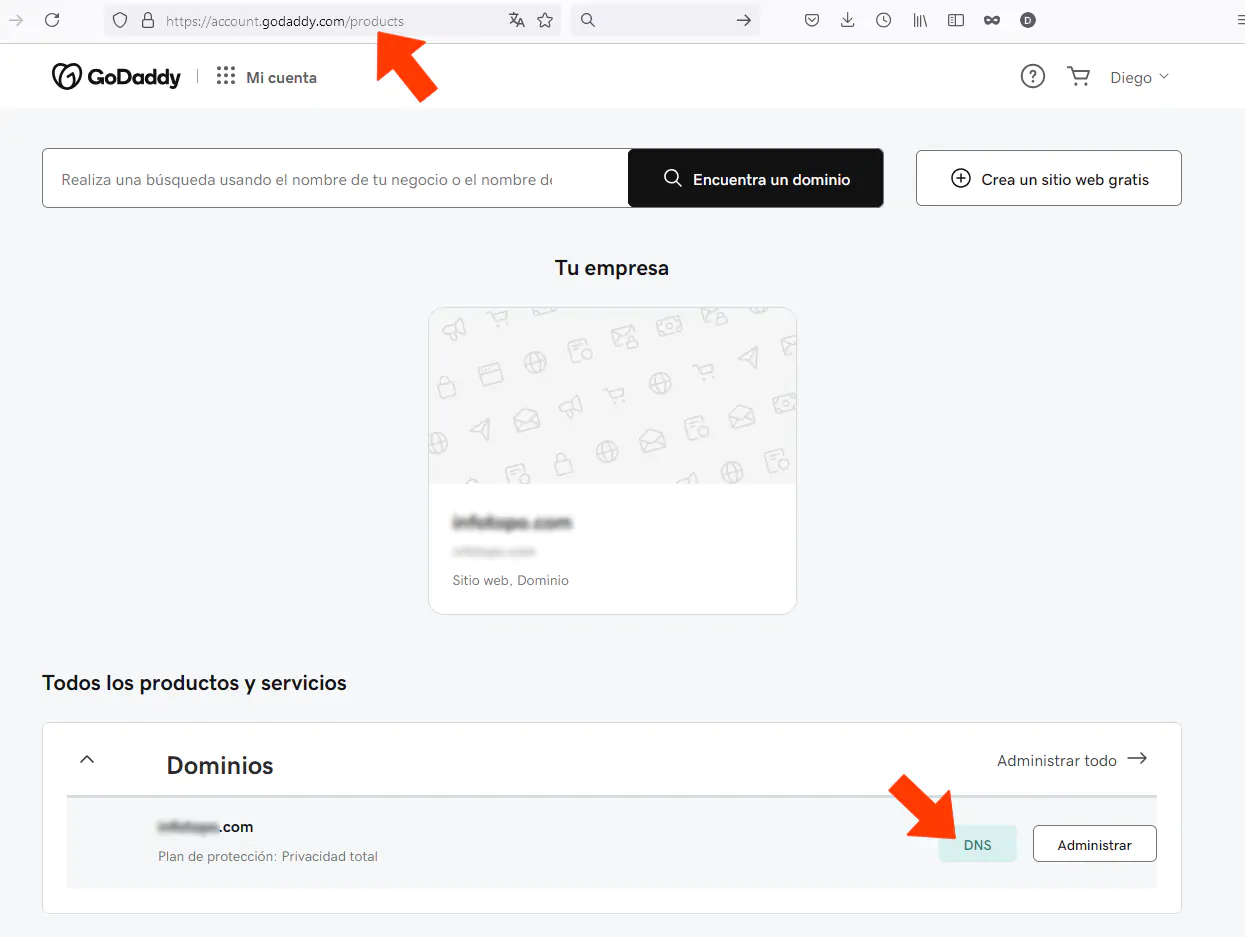
Y luego:
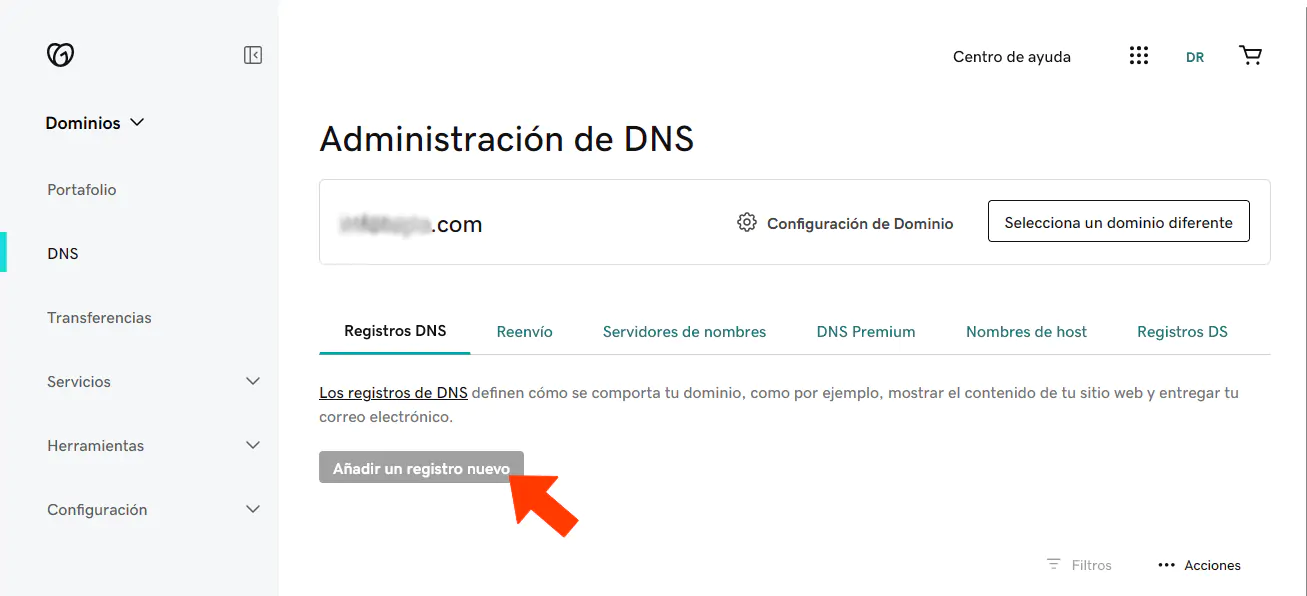
Nota: si esta opción no está disponible, sucederá que es el servicio de nuestro hosting quién administra los DNS, y, por ende, deberemos acudir a la empresa en cuestión.
En el formulario de la ventana emergente llenaremos los campos tal cual se especifica en la captura debajo:

Es decir:
Tipo: TXT
Nombre: @
Valor: ( Pegar el registro de TXT que nos ha creado Google Search Console )
TTL: 1 hora
Tras este paso, volveremos a la ventana en donde tenemos abierto Google Search Console y presionaremos sobre el botón Verificar.
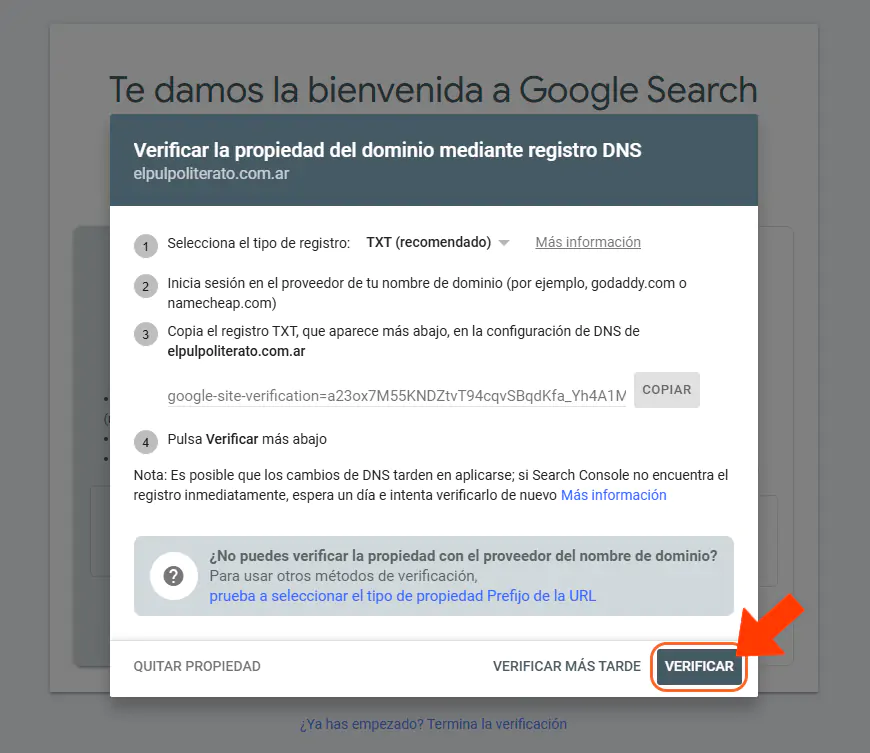
Si recibimos un mensaje de error, deberemos esperar dado que el proceso de creación de registro que hemos hecho podría tardar algunas horas.
Cuando este paso se concreta de manera exitosa, veremos el cartel correspondiente con el mensaje de validación concretada.
Método alternativo de verificación
Para esta alternativa elegiremos la segunda opción en Google Search Console, es decir Prefijo de la URL.
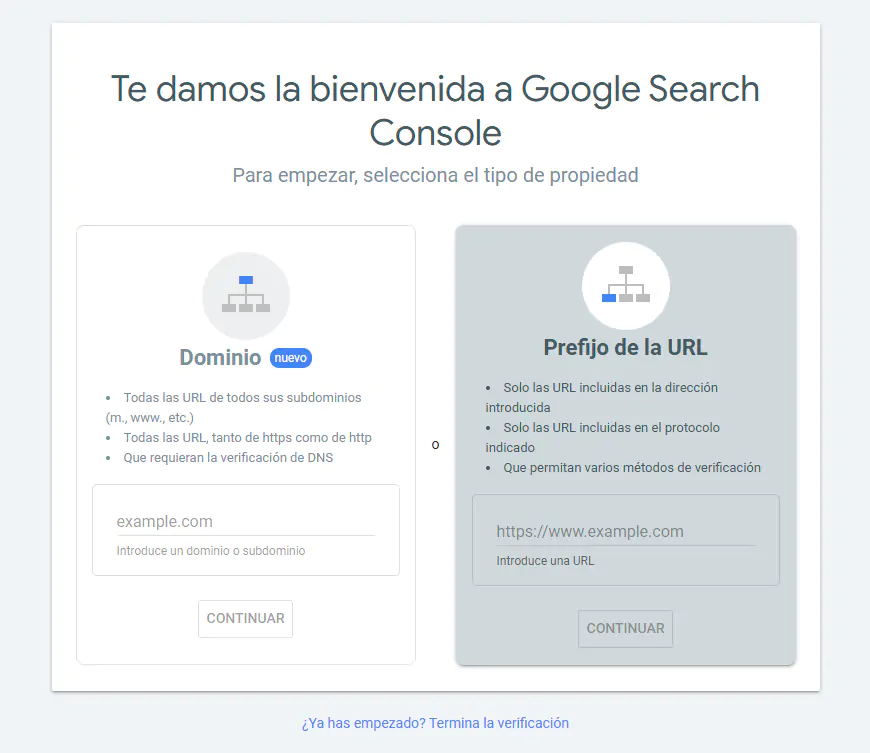
Como explicamos antes, no elegimos este método primero porque se limita a una dirección (ej.: https://www.miempresa.com/ y todo el contenido dentro), mientras que con el método de verificación de Dominio explicado anteriormente nos aseguramos de que los subdominios también ingresen al servicio de Google (ej.: mobile.miempresa.com).
En el campo que nos pide "Introduce una URL", ingresaremos entonces la URL a rastrear, como por ejemplo https://www.miempresa.com. En este caso debemos ser exactos, dado que hay dominios con certificados SSL (https) y otros no (http). Lo mismo ocurre con "www". Nuestro sitio, duplika.com, por ejemplo, NO usa www en su dominio.
Tras escribir el dominio correcto y hacer clic sobre el botón CONTINUAR, Google nos ofrecerá diversos métodos de verificación.
Archivo HTML (recomendado)
Etiqueta HTML
Google Analytics
Google Tag Manager
Proveedor de nombres de dominio
Iremos por el método recomendado, bien facilito: descargaremos un archivo HTML que nos crea Google. Este archivo deberá ser subido a la misma URL que hemos ingresado al comienzo de este método alternativo.
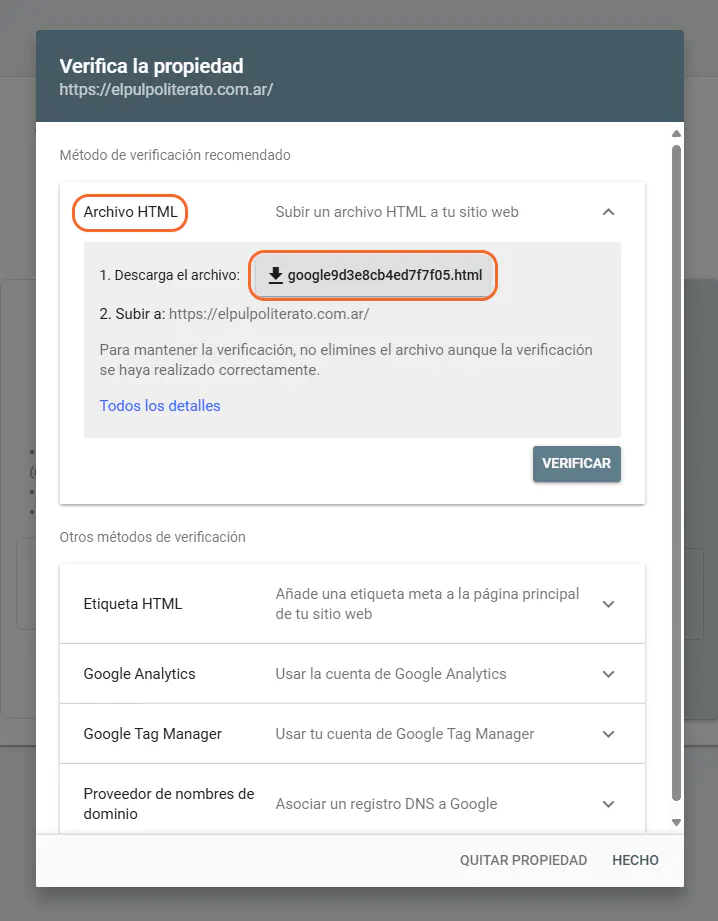
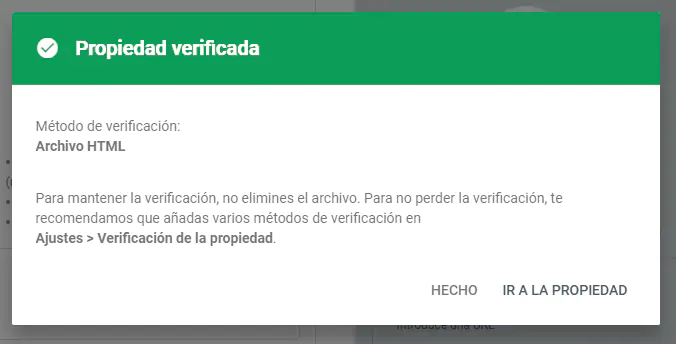
Tras estos dos pasos, daremos clic sobre el botón VERIFICAR. Si hemos subido el archivo correctamente, veremos la siguiente ventana emergente.
Añadiendo mi sitemap a Google Search Console
En la ventana de la captura superior, haremos clic sobre IR A LA PROPIEDAD.
Allí buscaremos la herramienta de Sitemaps y haremos clic sobre ella para encontrarnos con la sección siguiente:
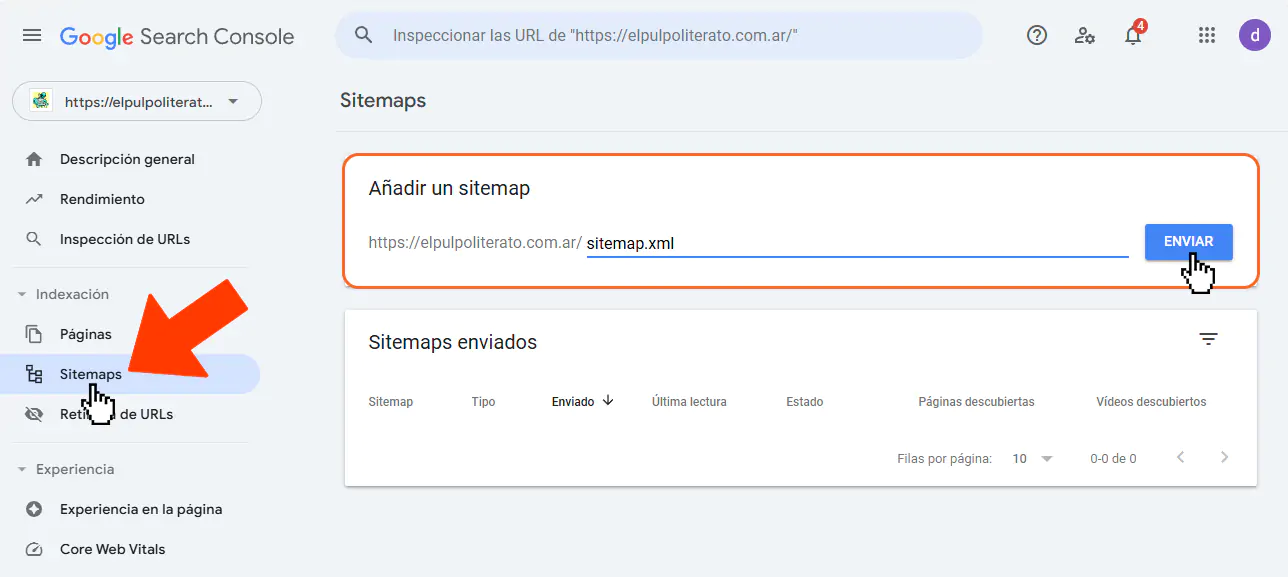
Como mostramos en la captura superior, simplemente completaremos la URL de nuestro sitemap con el nombre del archivo según hemos podido comprobarlo aquí.
Tras escribir la ruta correcta, haremos clic sobre ENVIAR y deberemos ver un mensaje como el siguiente:
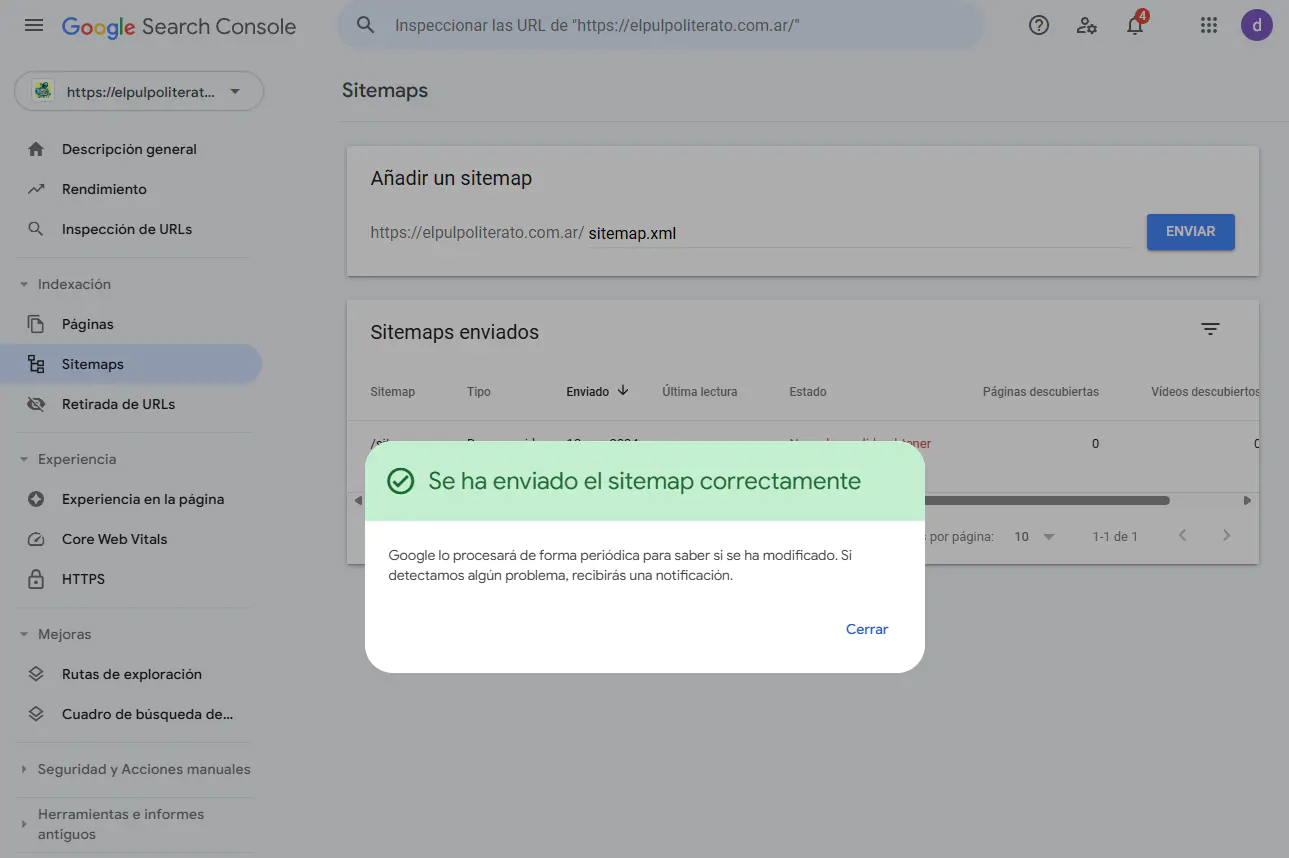
Tras este paso, hemos terminado la guía para poder añadir nuestro sitio a Google Search Console e incorporar un mapa del sitio para su rastreo inmediato.
Agradecemos la lectura y les deseamos éxitos en sus emprendimientos.